本节主要介绍了如何借助petalinux工具构建一个linux基础系统
PetaLinux基本介绍
PetaLinux工具可简化赛灵思器件上的嵌入式Linux开发
PetaLinux工具只需要7条命令即可简化基于Linux的产品开发

- 我也是第一次接触操作系统,不太清楚PetaLinux具体的工作是啥,但上面这幅图就很形象,它能帮我们完成Linux操作系统搭建的一系列步骤,然后我们就可以更多的关注实际应用开发本身
具体参考Xilinx官方介绍视频:赛灵思嵌入式 Linux 构建流程:PetaLinux 工具(中文字幕) (xilinx.com)
PetaLinux安装
应该可以在xilinx的官网上找到安装包,我直接在同门那拷贝了一份(如果有找不到的可以邮箱私信我取)
直接chmod 777 ./petalinux-v2023.1-05012318-installer.run进行安装,但是可能会缺少依赖的库,报啥错就对应安装对应的库
安装后可以输入echo $PETALINUX,如果出现安装路径,则说明安装正确

PetaLinux的七条命令
petalinux-create可创建对象并将其包含到PetaLinux工程中,包括PetaLinux工程本身、应用以及模块
1
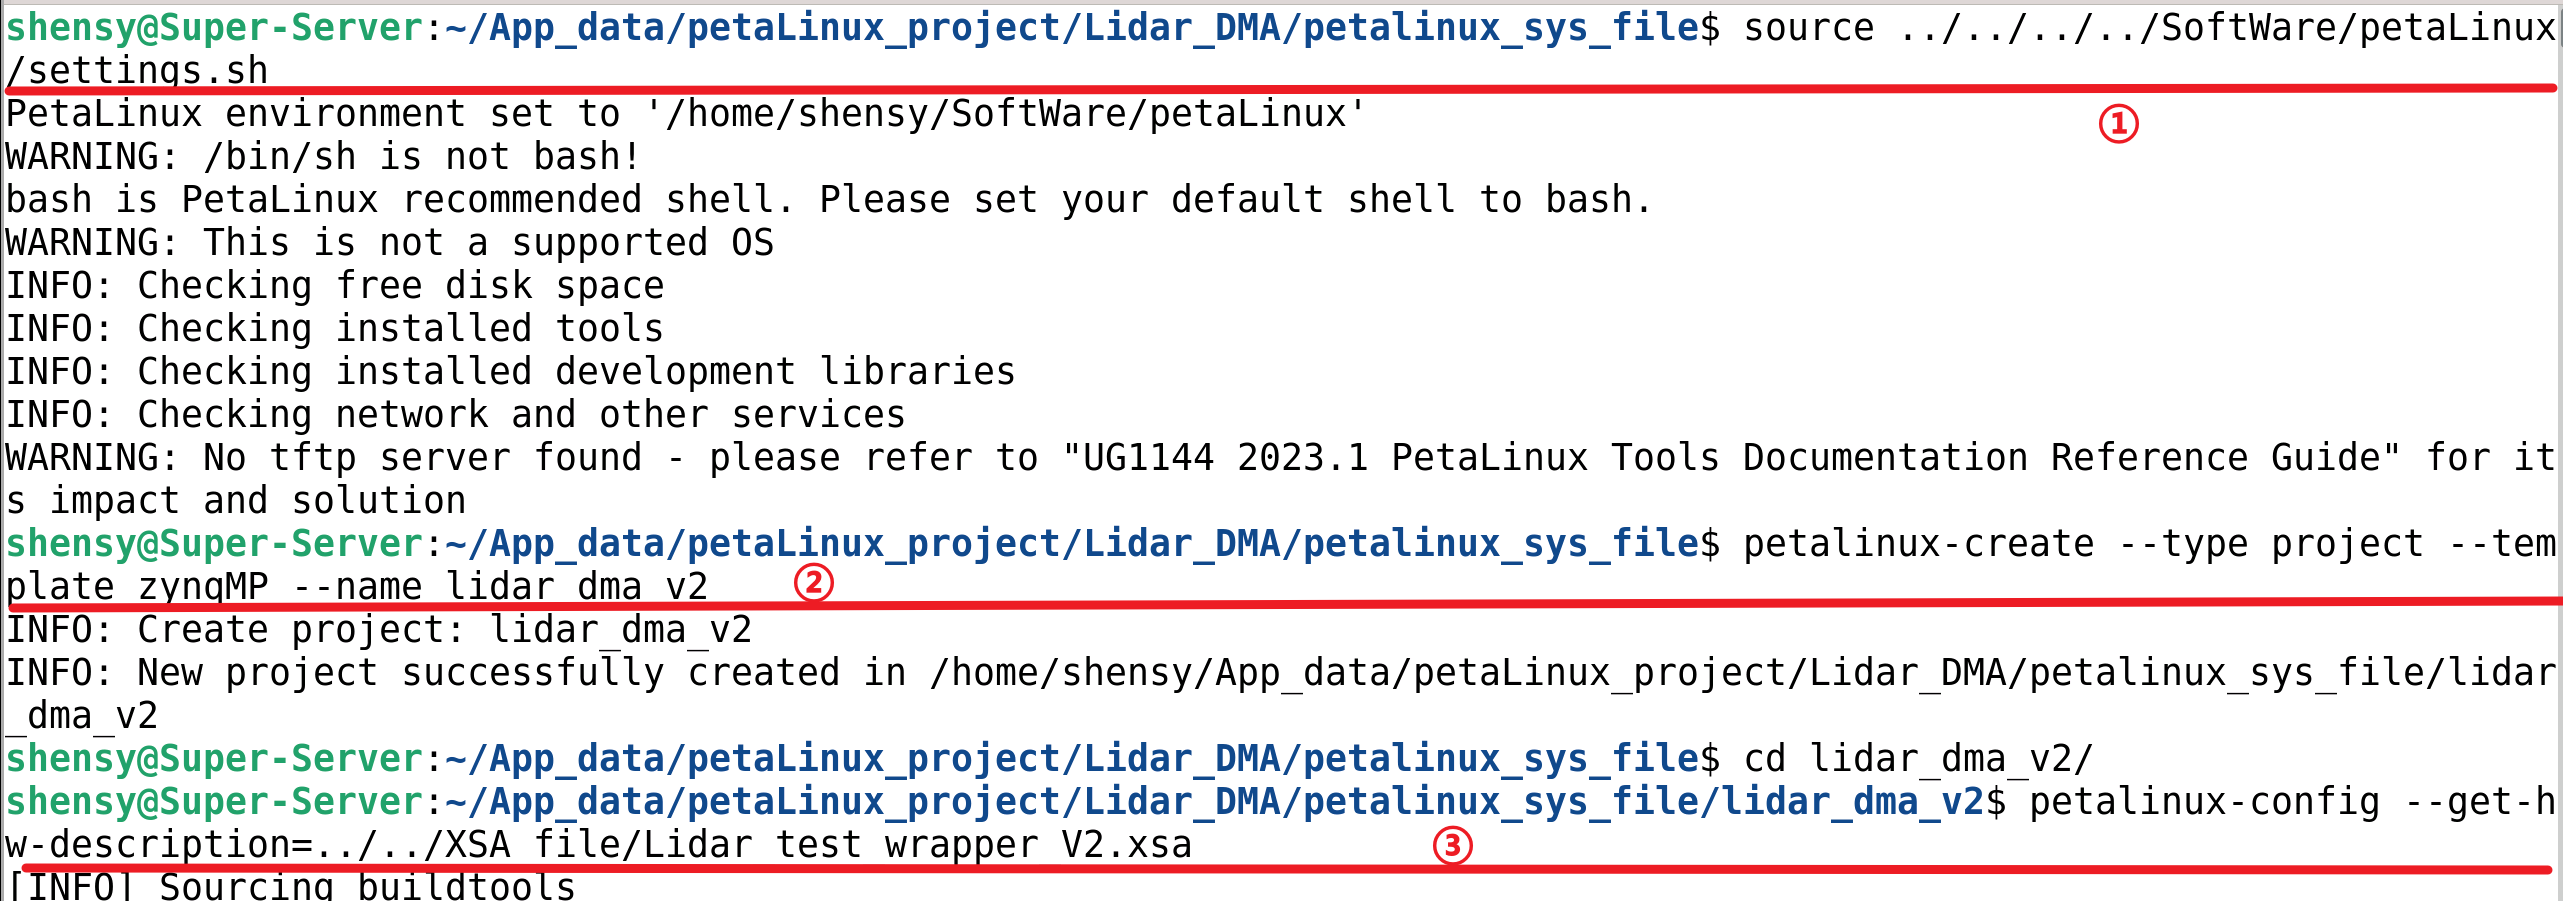
petalinux-create --type project --template <PLATFORM> --name <PROJECT_NAME>
- 参数如下:
- —template
- zynqMP (UltraScale+™ MPSoC)
- zynq (Zynq-7000 器件)
- microblaze (MicroBlaze™ CPU)
- —name
- 您正在构建的工程名称。
- —template
- 参数如下:
petalinux-config工具允许在工程级别或工程组件级别进行自定义,它还可提供工作空间用于安装软件补丁
1
petalinux-config --get-hw-description=<path-to-directory-containinghardware description-file>
- 利用 petalinux-config 命令导入硬件描述, 按如下要求提供含有 .hdf/.dsa 文件的目录路径
petalinux-build工具可构建整个嵌入式Linux系统,也可构建Linux系统的指定组件
1
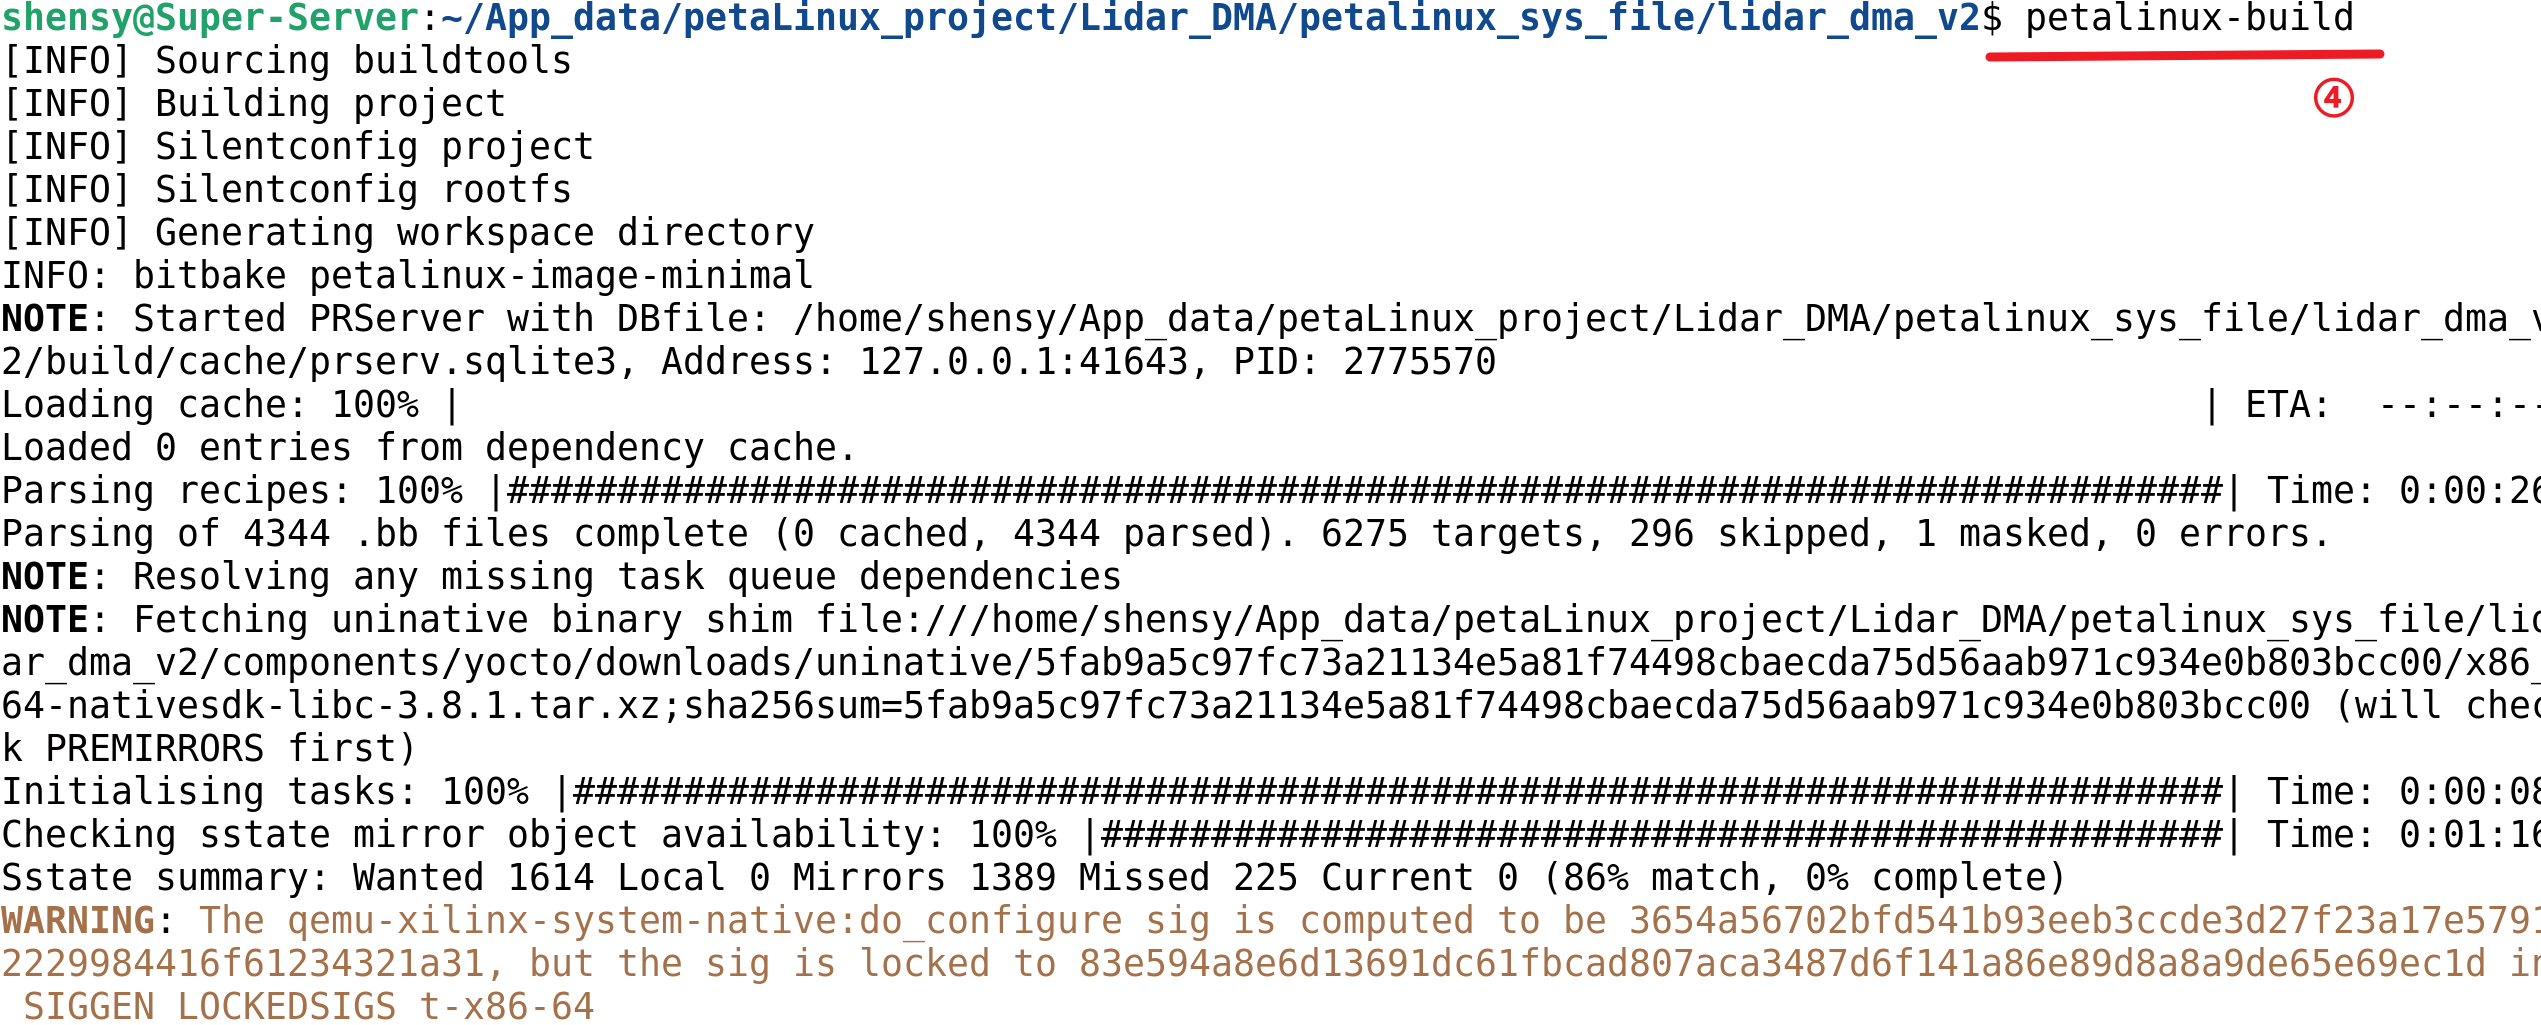
petalinux-build
petalinux-boot工具用于加载并启动PetaLinux镜像,包括利用实体板上的JTAG或借助系统的QEMU模型
1
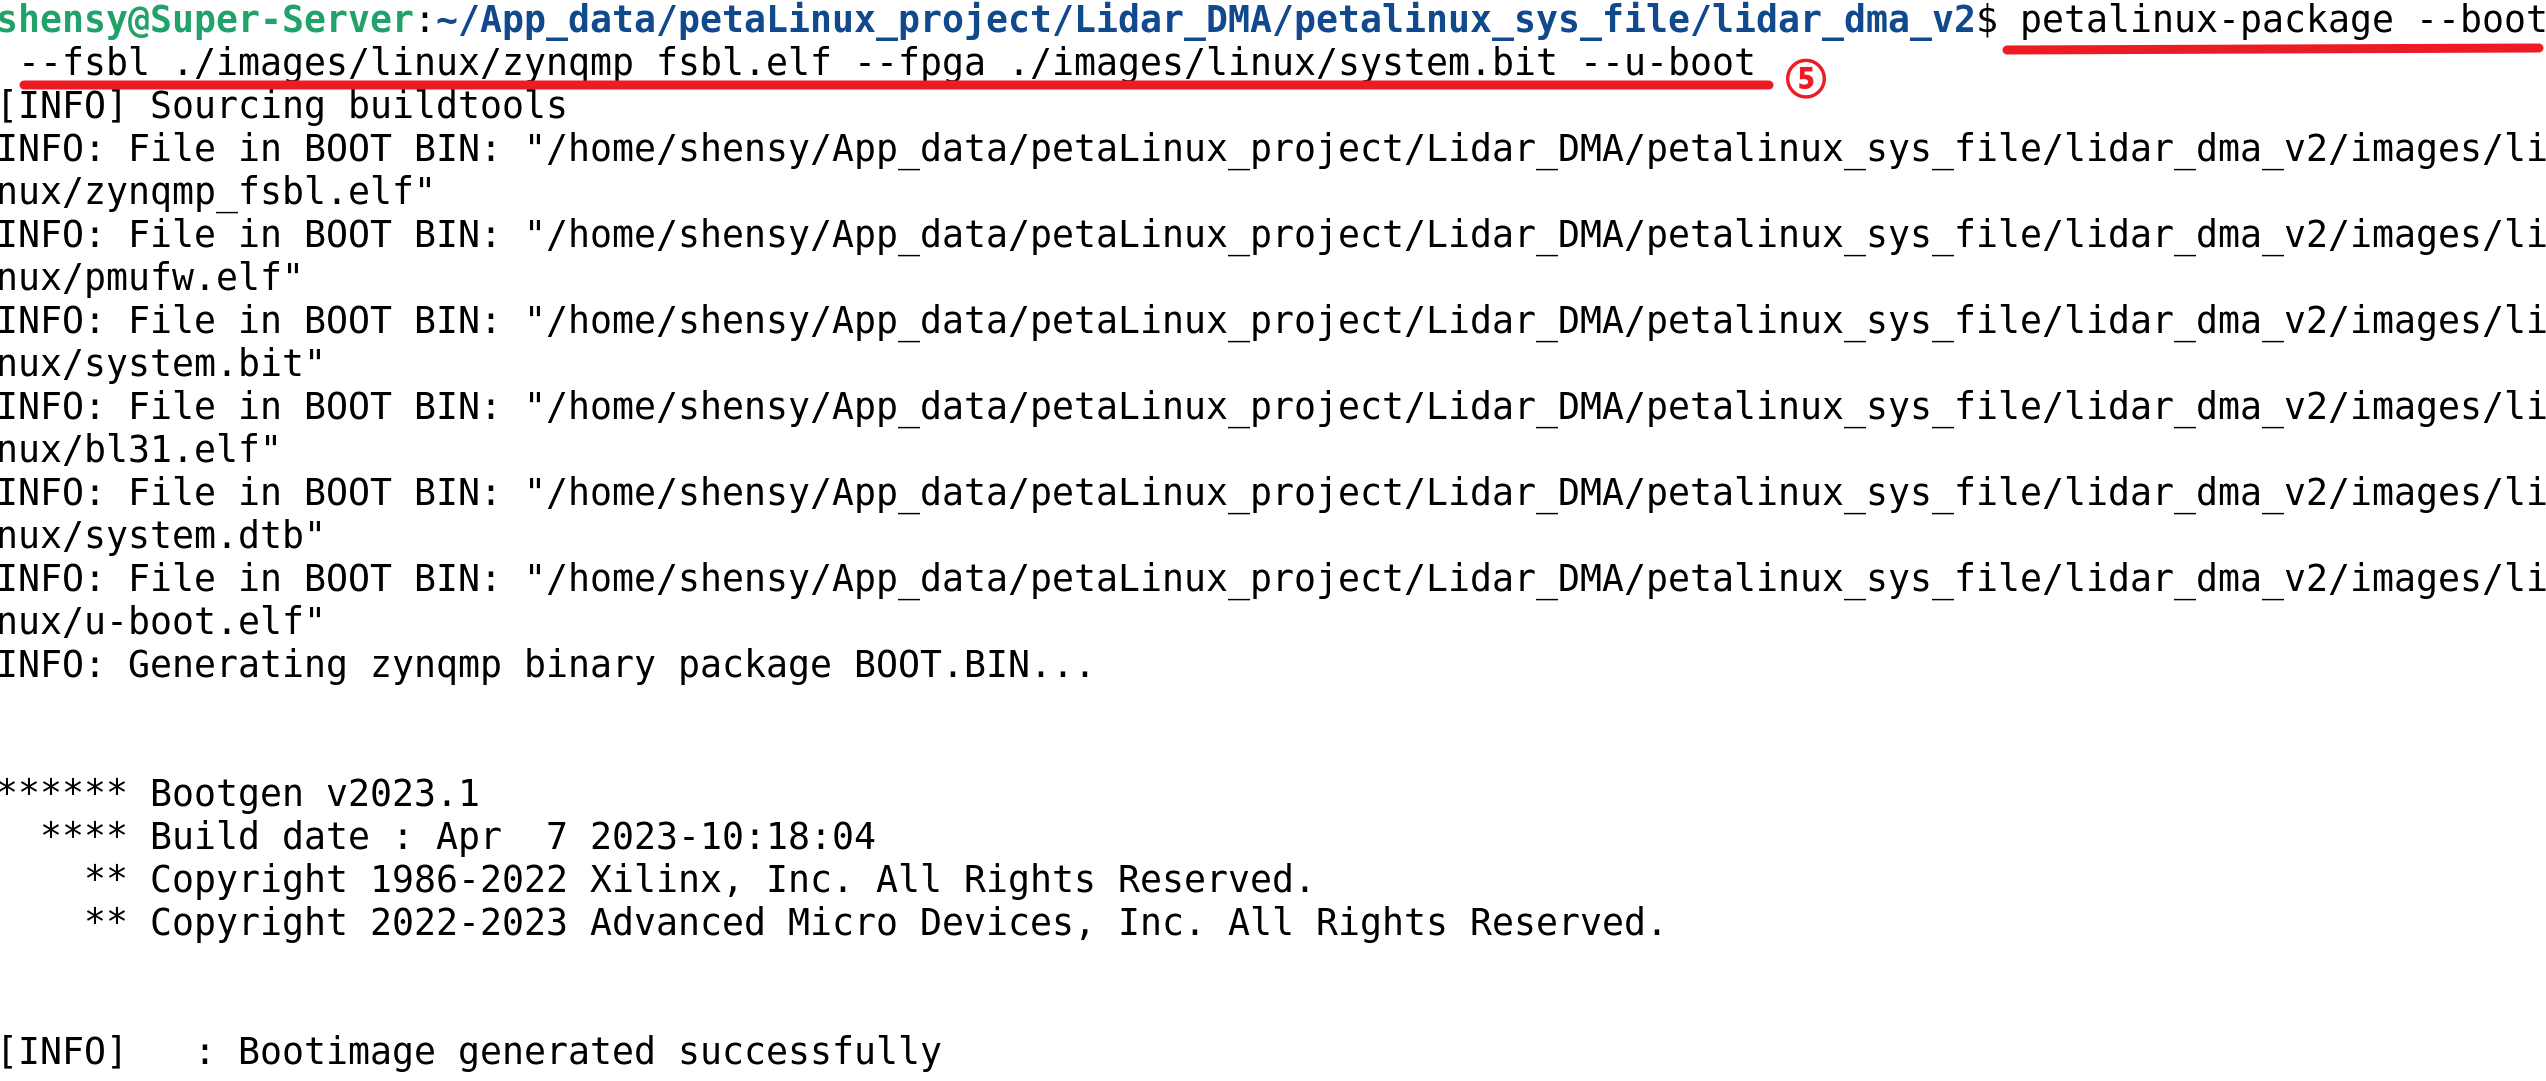
petalinux-package --boot --fsbl <FSBL image> --fpga <FPGA bitstream> --u-boot
- 按照上面的步骤生成 .BIN 格式的启动镜像
petalinux-package工具可将PetaLinux工具封装为适合部署的格式
1
petalinux-package --image -c kernel --format uImage
- 如果想使用 uImage,请使用 petalinux-package —image
petalinux-util工具支持您访问GDB等各种实用工具
petalinux-upgrade工具可执行次要版本升级以使用最新系统软件组件
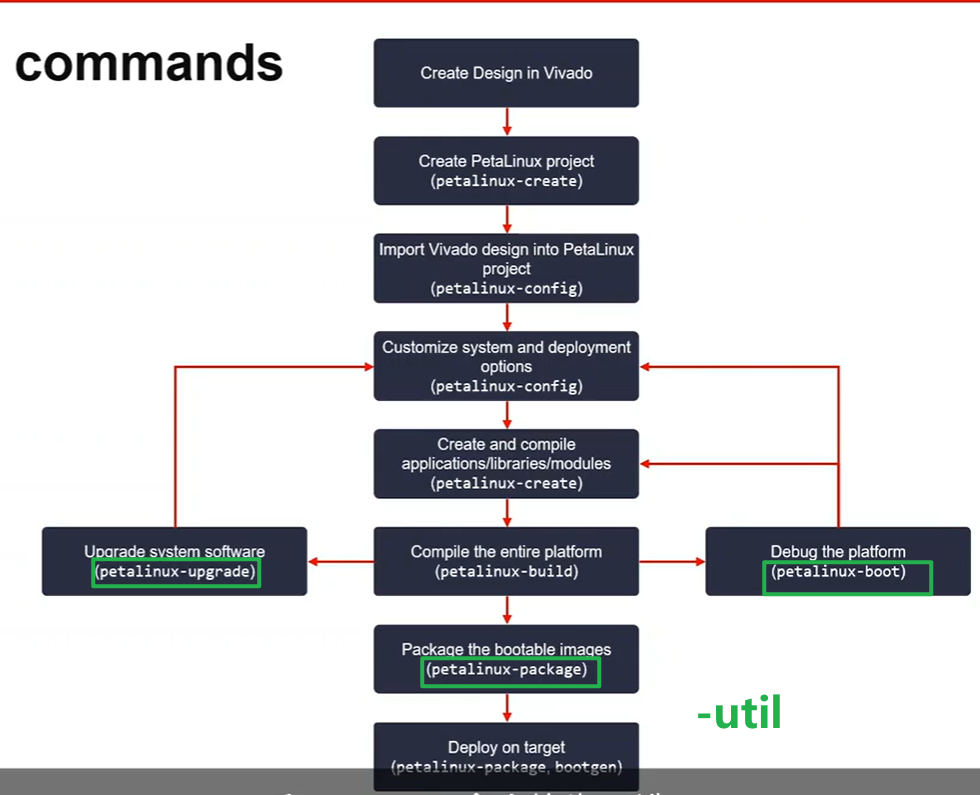
- 图中绿色标注均为可选命令
PetaLinux搭建一个基础的Linux系统
具体步骤如下:但需要注意的是在create完成一个petalinux的project后,一定cd到对应project文件夹下执行后续操作
接下来将生成的文件拷贝至sd卡中
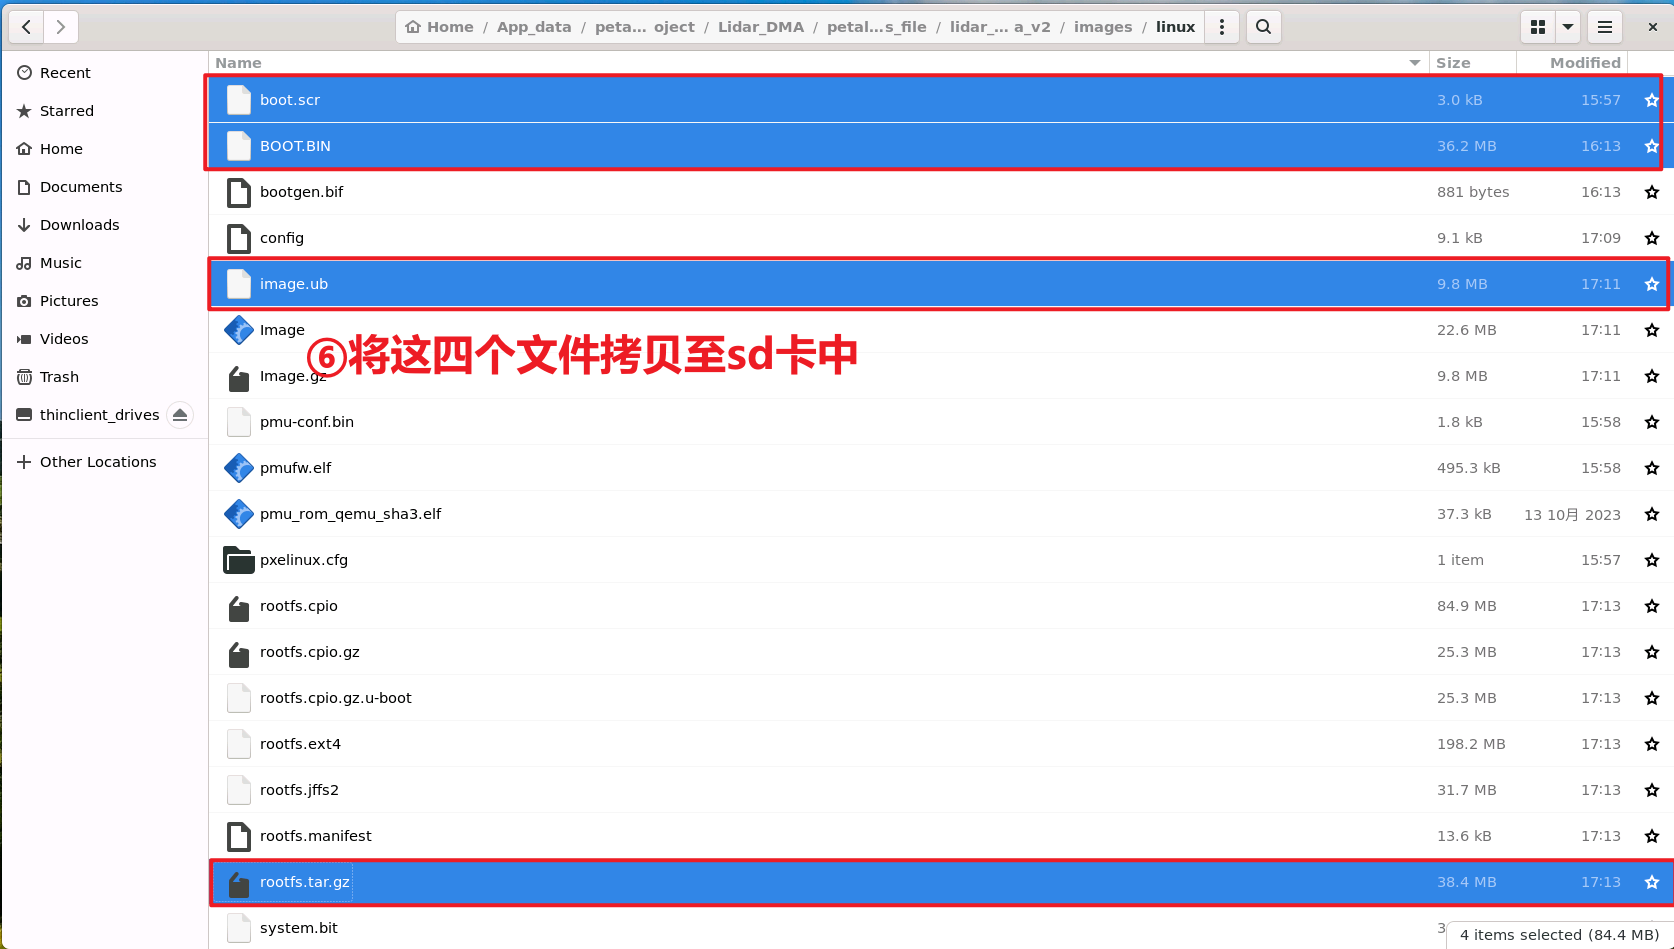
这里需要用到虚拟机,因为服务器上是看不到sd卡的分区的
SD 中将 RootFS (rootfs.tar.gz)加载到 ext4 分区, 所有其他启动镜像(boot.scr、BOOT.BIIN、image.ub)加载到 FAT32 分区
1
2
3
4
5
6
7
8
9
10
11
12
13
14
15
16
17
18
19
20
21
22
23
24
25
26
27
28
29
30
31
32
33
ssy@ssy-virtual-machine:~$ cd /mnt/
ssy@ssy-virtual-machine:/mnt$ ls
BOOT hgfs RootFS
ssy@ssy-virtual-machine:/mnt$ sudo mount /dev/sdb1 BOOT/
ssy@ssy-virtual-machine:/mnt$ sudo mount /dev/sdb2 RootFS/
ssy@ssy-virtual-machine:/mnt$ cd BOOT/
ssy@ssy-virtual-machine:/mnt/BOOT$ ls
ssy@ssy-virtual-machine:/mnt/BOOT$ cd ..
ssy@ssy-virtual-machine:/mnt$ cd BOOT/
ssy@ssy-virtual-machine:/mnt/BOOT$ sudo cp ~/BOOT.BIN .
ssy@ssy-virtual-machine:/mnt/BOOT$ sudo cp ~/boot.scr .
ssy@ssy-virtual-machine:/mnt/BOOT$ sudo cp ~/image.ub .
ssy@ssy-virtual-machine:/mnt/BOOT$ sync
ssy@ssy-virtual-machine:/mnt/BOOT$ cd ..
ssy@ssy-virtual-machine:/mnt$ cd RootFS/
ssy@ssy-virtual-machine:/mnt/RootFS$ ls
lost+found
ssy@ssy-virtual-machine:/mnt/RootFS$ sudo rm -rf *
ssy@ssy-virtual-machine:/mnt/RootFS$ ls -l
total 0
ssy@ssy-virtual-machine:/mnt/RootFS$ sudo tar -xzvf ~/rootfs.tar.gz
ssy@ssy-virtual-machine:/mnt/RootFS$ sync
ssy@ssy-virtual-machine:/mnt/RootFS$ cd ..
ssy@ssy-virtual-machine:/mnt$ sudo umount /dev/sdb*
umount: /dev/sdb: not mounted.
ssy@ssy-virtual-machine:/mnt$ sudo umount /dev/sdb*
umount: /dev/sdb: not mounted.
umount: /dev/sdb1: not mounted.
umount: /dev/sdb2: not mounted.
ssy@ssy-virtual-machine:/mnt$ sudo umount /dev/sdb*
umount: /dev/sdb: not mounted.
umount: /dev/sdb1: not mounted.
umount: /dev/sdb2: not mounted.
搭建Petalinux后代码下载
这里发现了一个bug,那就是如果把每个vivado工程都生成bit流,然后运行petalinux那几条命令,如果直接将文件下载到sd卡中,有可能会导致系统卡死(反正我当时加了个dma系统直接卡死了)
解决办法:用空工程(ps的最小系统)利用petalinux搭建操作系统,然后进入到操作系统后,直接把bitstream在线加载到系统中(2024.06.24更新:直接弄一个空工程在线下载比特流能进系统但可能操作不了ps端,所以如果是ps部分或ps与pl部分交互部分的bd有修改,那么直接用.xsa重新创建一个petalinux,如果只修改了pl,则可以在线更新bit流)
将bit文件打包成bit.bin文件(假设你的bit文件名称是mybit.bit,新建一个xxx.bif,内容如下)
1
2
3
all:{
mybit.bit
}- 在服务器上使用命令行
bootgen -image xxx.bif -arch zynqmp -process_bitstream bin,这样就可以得到mybit.bit.bin文件,接着将该文件下载到自己电脑上
- 在服务器上使用命令行
打开板子进入系统
1
sudo ifconfig eth0 xxx.xxx.xxx.xxx
- 这个xxx.xxx.xxx.xxx是你给板子的IP地址,用来给你的电脑和板子之间进行通信
- 找一条网线,分别连接板子和你的电脑
- 然后你的电脑的网口IP更改成xxx.xxx.xxx.1,保证和板子的IP在同一个网段
之后用远程工具,SSH登录xxx.xxx.xxx.xxx,也就是板子的IP,远程使用板子上的命令行,这时候可以用SSH把文件传到板子上。
最后用如下命令将bit流下载到板子中
1
sudo fpgautil -b xxx.bit.bin -f Full
其实后面执行编译好的xxx.o文件也是同样的扒拉文件到板子操作系统上的流程。注意要添加权限
1
2
sudo chmod +x ./xxx.o
sudo ./xxx.o
附加知识点
如何在虚拟机上对sd卡分盘
1
2
3
4
5
6
7
8
9
10
11
12
13
14
15
16
17
18
19
20
21
22
23
24
25
26
27
28
29
30
31
32
33
34
35
36
37
38
39
40
41
42
43
44
45
46
47
48
49
50
51
52
53
54
55
56
57
58
59
60
61
62
63
64
65
66
67
68
69
70
71
72
73
74
75
76
77
78
79
80
81
82
83
84
85
86
87
88
89
90
91
92
93
94
95
96
97
98
mzmylhz@ubuntu:/mnt$ sudo umount /dev/sdb*
mzmylhz@ubuntu:/mnt$ sudo fdisk /dev/sdb
Welcome to fdisk (util-linux 2.34).
Changes will remain in memory only, until you decide to write them.
Be careful before using the write command.
Command (m for help): p
Disk /dev/sdb: 119.38 GiB, 128177930240 bytes, 250347520 sectors
Disk model: Storage Device
Units: sectors of 1 * 512 = 512 bytes
Sector size (logical/physical): 512 bytes / 512 bytes
I/O size (minimum/optimal): 512 bytes / 512 bytes
Disklabel type: dos
Disk identifier: 0x7245180a
Device Boot Start End Sectors Size Id Type
/dev/sdb1 2048 11111240 11109193 5.3G 83 Linux
/dev/sdb2 11112448 250347519 239235072 114.1G 83 Linux
Command (m for help): d
Partition number (1,2, default 2):
Partition 2 has been deleted.
Command (m for help):
Command (m for help): d
Selected partition 1
Partition 1 has been deleted.
Command (m for help):
Command (m for help): p
Disk /dev/sdb: 119.38 GiB, 128177930240 bytes, 250347520 sectors
Disk model: Storage Device
Units: sectors of 1 * 512 = 512 bytes
Sector size (logical/physical): 512 bytes / 512 bytes
I/O size (minimum/optimal): 512 bytes / 512 bytes
Disklabel type: dos
Disk identifier: 0x7245180a
Command (m for help): n
Partition type
p primary (0 primary, 0 extended, 4 free)
e extended (container for logical partitions)
Select (default p): p
Partition number (1-4, default 1):
First sector (2048-250347519, default 2048):
Last sector, +/-sectors or +/-size{K,M,G,T,P} (2048-250347519, default 250347519): 11111240
Created a new partition 1 of type 'Linux' and of size 5.3 GiB.
Partition #1 contains a vfat signature.
Do you want to remove the signature? [Y]es/[N]o: y
The signature will be removed by a write command.
Command (m for help): n
Partition type
p primary (1 primary, 0 extended, 3 free)
e extended (container for logical partitions)
Select (default p): p
Partition number (2-4, default 2):
First sector (11111241-250347519, default 11112448):
Last sector, +/-sectors or +/-size{K,M,G,T,P} (11112448-250347519, default 250347519):
Created a new partition 2 of type 'Linux' and of size 114.1 GiB.
Partition #2 contains a ext4 signature.
Do you want to remove the signature? [Y]es/[N]o: y
The signature will be removed by a write command.
Command (m for help): w
The partition table has been altered.
Calling ioctl() to re-read partition table.
Syncing disks.
mzmylhz@ubuntu:/mnt$ sudo mkfs.fat /dev/sdb1
mkfs.fat 4.1 (2017-01-24)
mzmylhz@ubuntu:/mnt$ sudo mkfs.ext4 /dev/sdb2
mke2fs 1.45.5 (07-Jan-2020)
Creating filesystem with 29904384 4k blocks and 7479296 inodes
Filesystem UUID: 3b09766c-cc62-4cba-a6fa-a72be0b39f82
Superblock backups stored on blocks:
32768, 98304, 163840, 229376, 294912, 819200, 884736, 1605632, 2654208,
4096000, 7962624, 11239424, 20480000, 23887872
Allocating group tables: done
Writing inode tables: done
Creating journal (131072 blocks): done
Writing superblocks and filesystem accounting information: doneVScode连接远程服务器:vscode连接远程服务器(傻瓜式教学)-CSDN博客
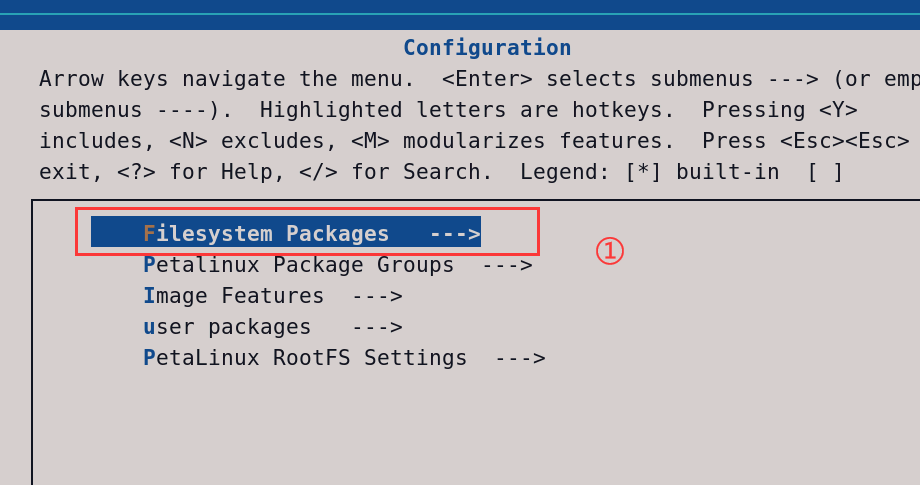
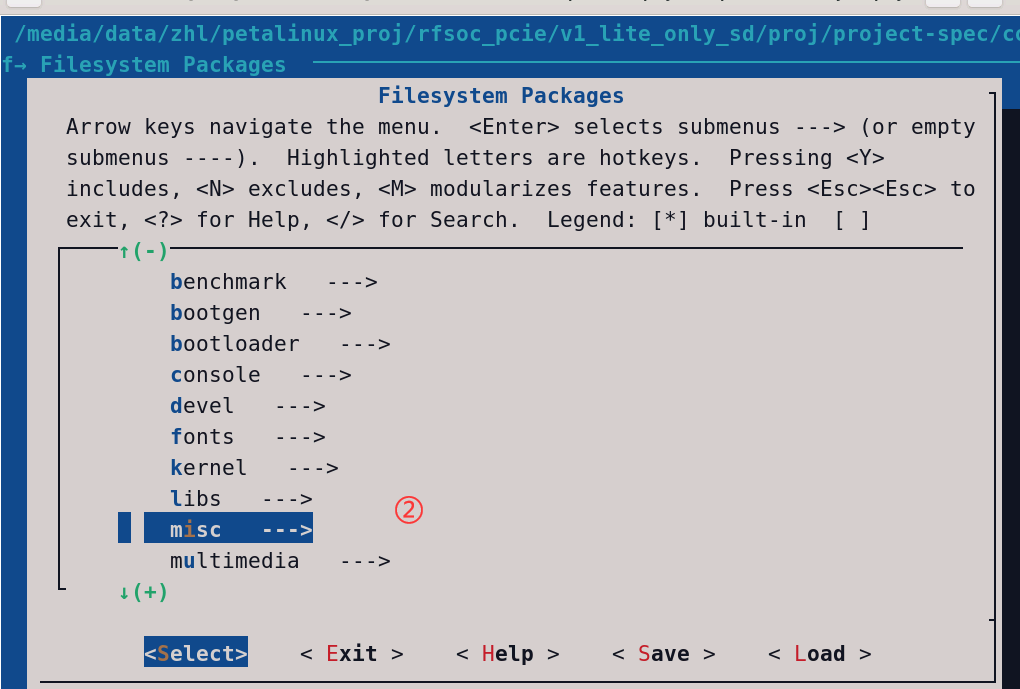
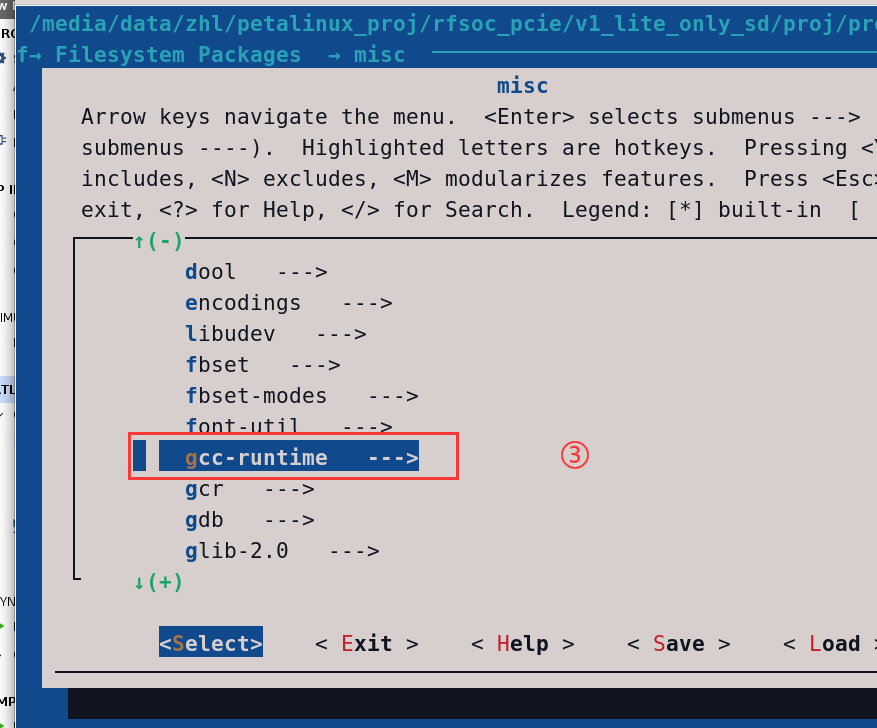
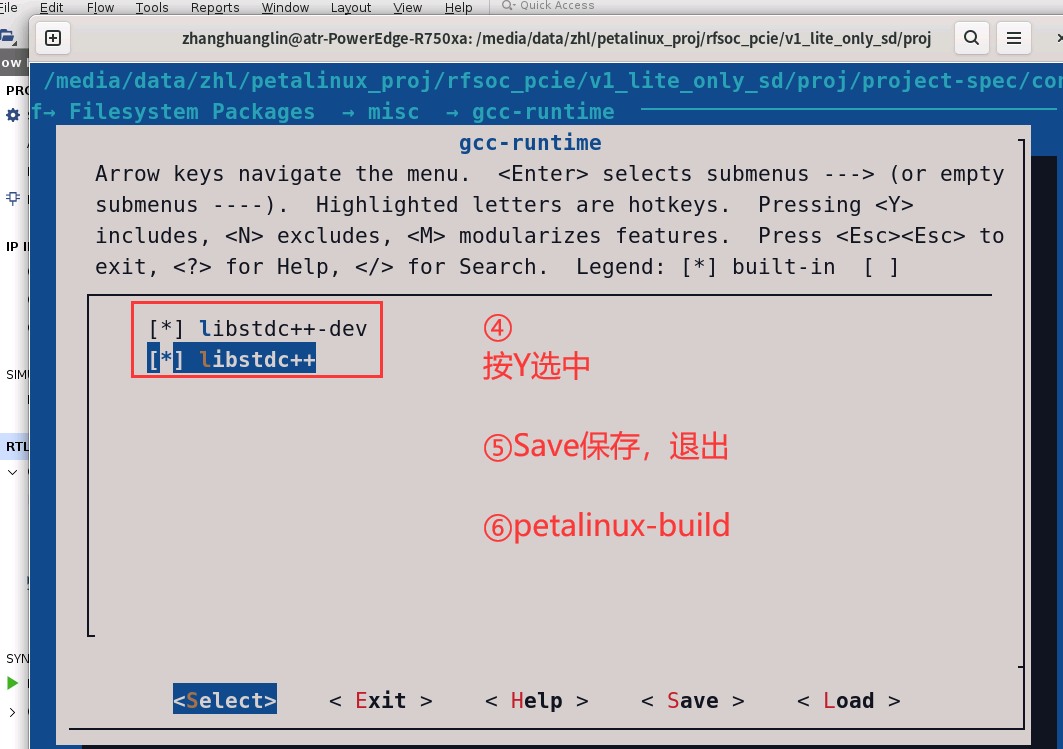
在系统上编译因为文件是CPP报错(如下原因就是petalinux系统默认是C文件,需要在petalinux-config中将C++的包添加进去)解决办法:

解决办法:petalinux-config -c rootfs