本文主要记录学习QT基础使用方法的流程,利用零碎的时间更新,不定期更新。工具上的东西主要是多练,我也是看视频学习的,记录得有点乱……
基本使用熟悉
1.编写一个Hello World程序
跟随这个视频上手就好:1.3编写一个Hello World程序_哔哩哔哩_bilibili(后续内容基本都是跟着这个UP主学习的)
主要注意创建工程时选择Qt widgets(带GUI)以及qmake就好
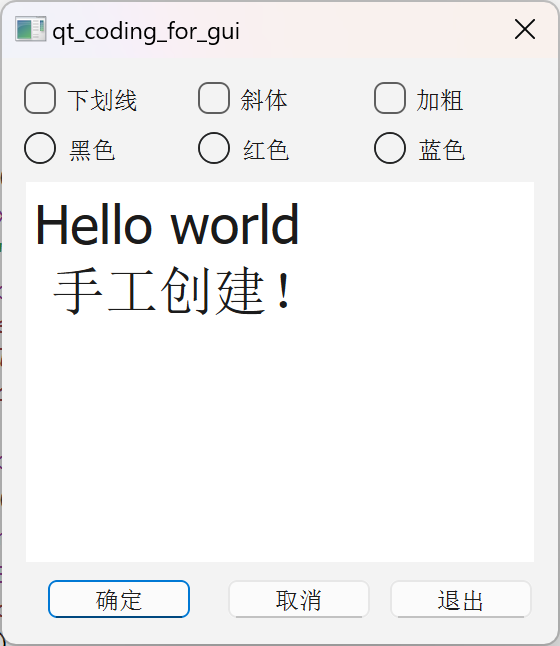
最后效果点击三角运行程序就好

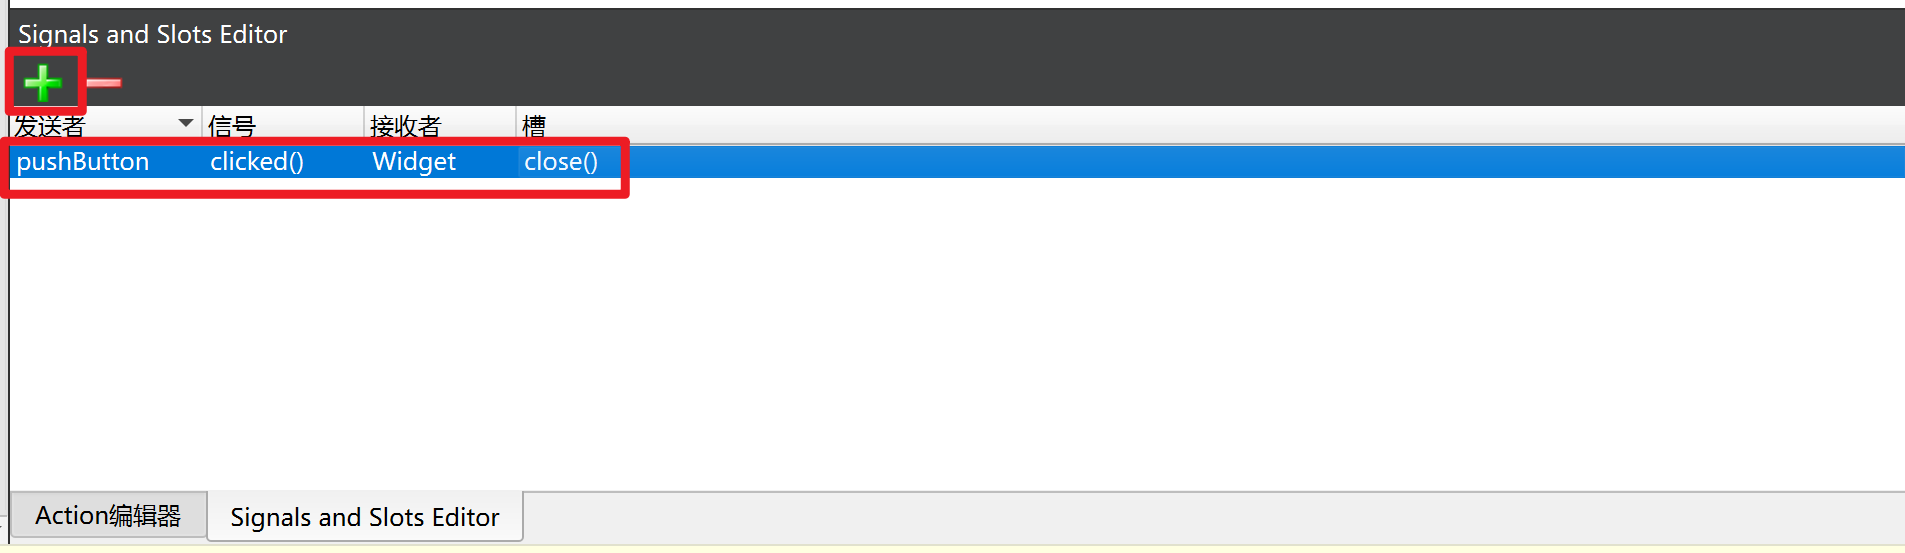
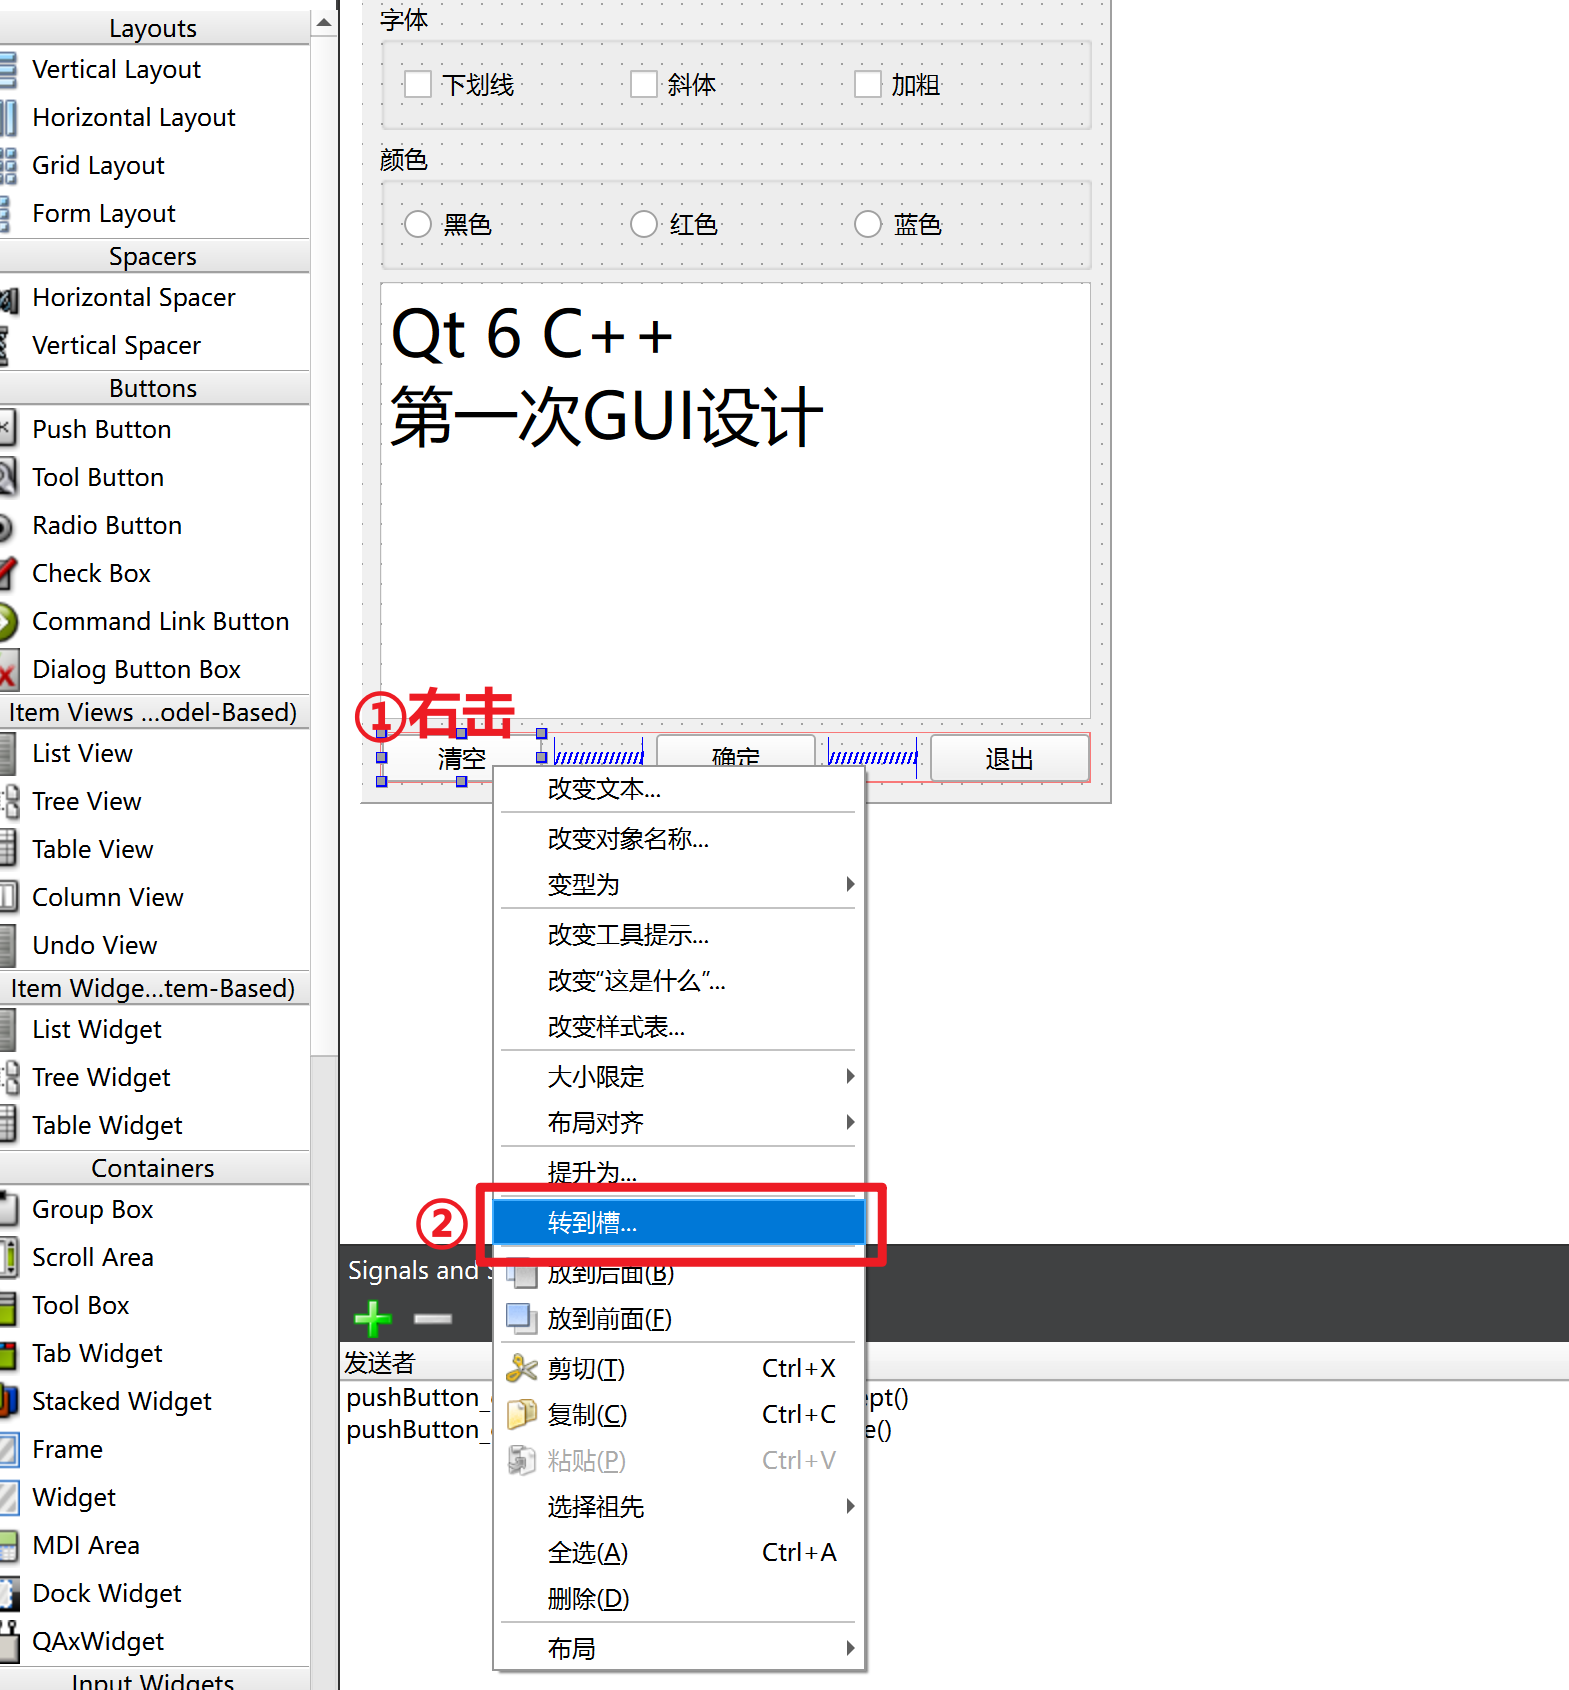
2.Signals and Slots Editor的简单使用
pushButton发送clicked()信号,被widget接收,然后widget窗口会close()关闭
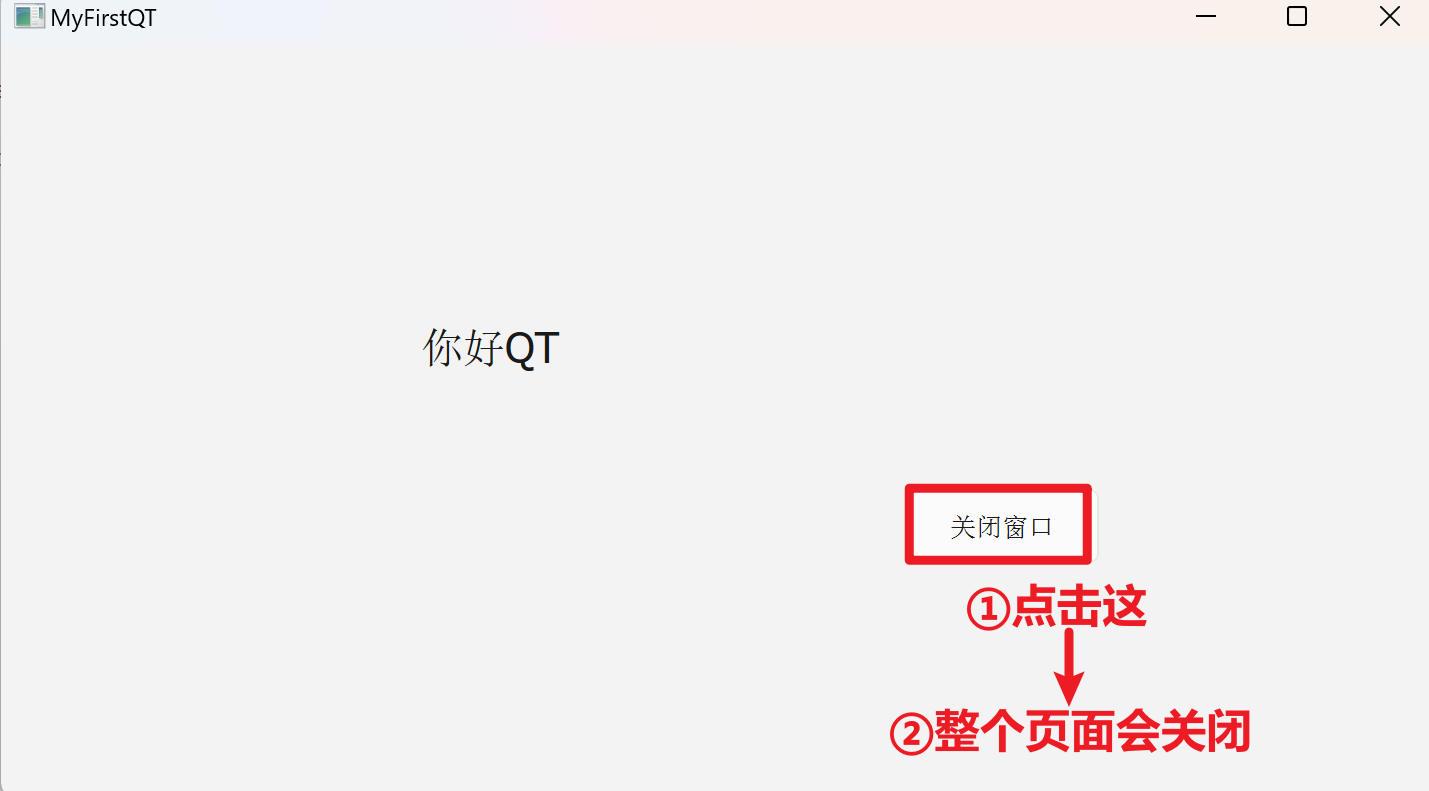
也可以在widget.cpp中修改代码去控制GUI界面
1
2ui->label->setText("你好QT");
ui->pushButton->setText("关闭窗口");最终效果:
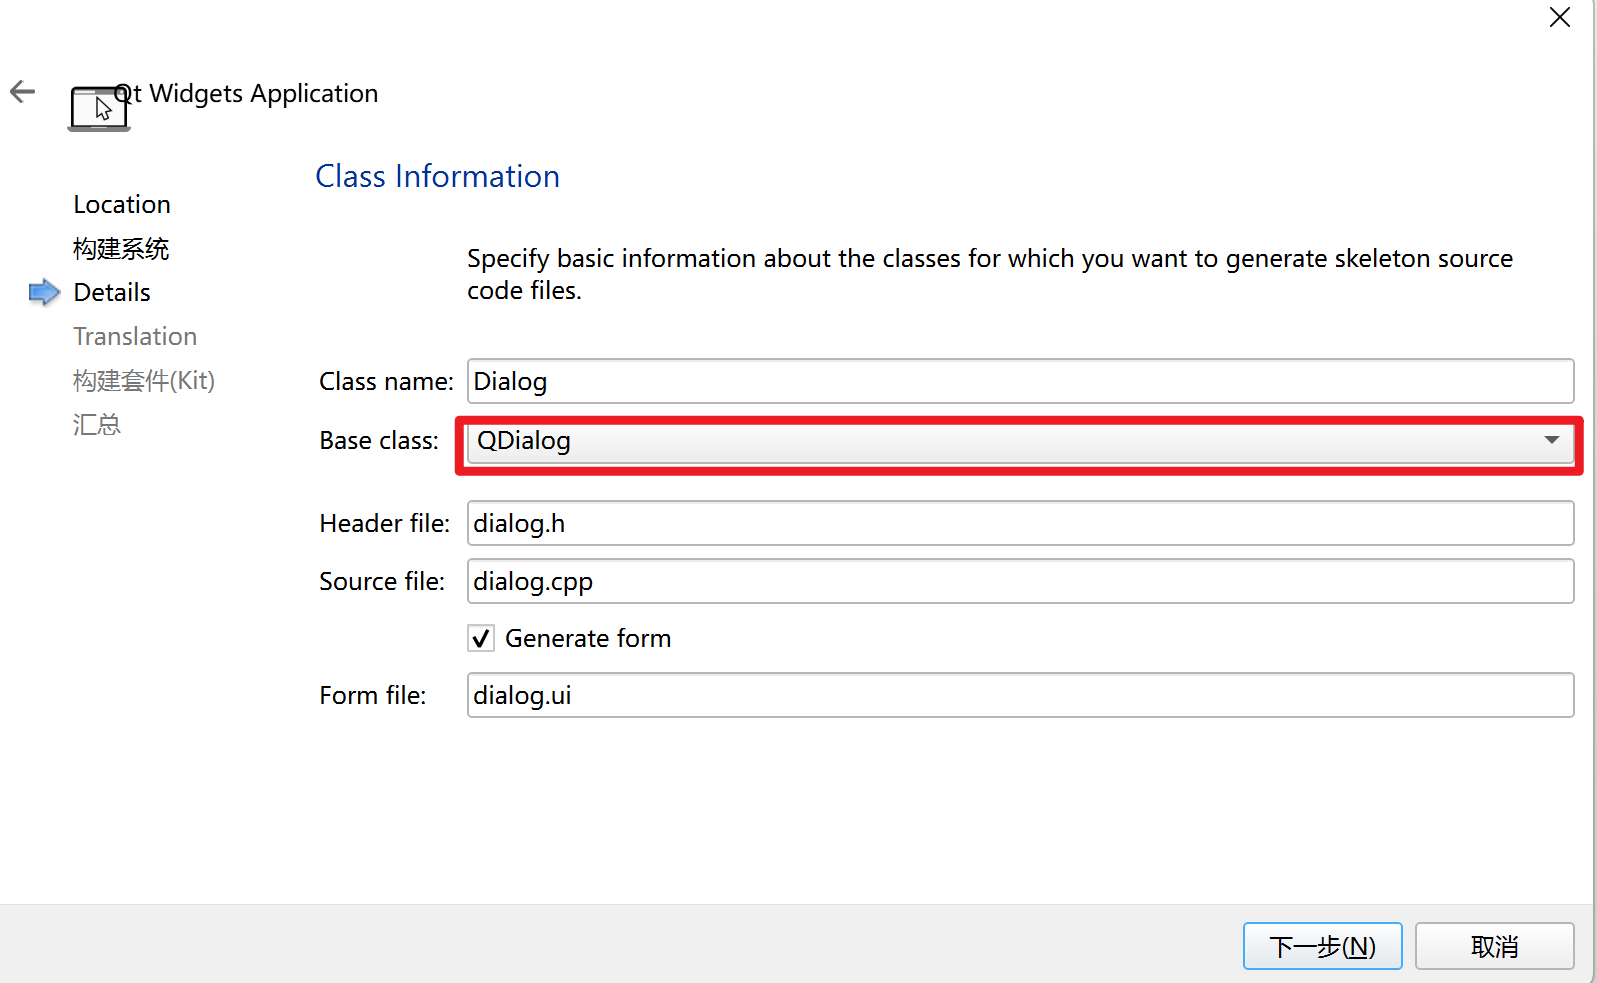
3.可视化UI设计
创建工程时选择qdialog(此时GUI界面的基类变成了qdialog)
大致布局如下:
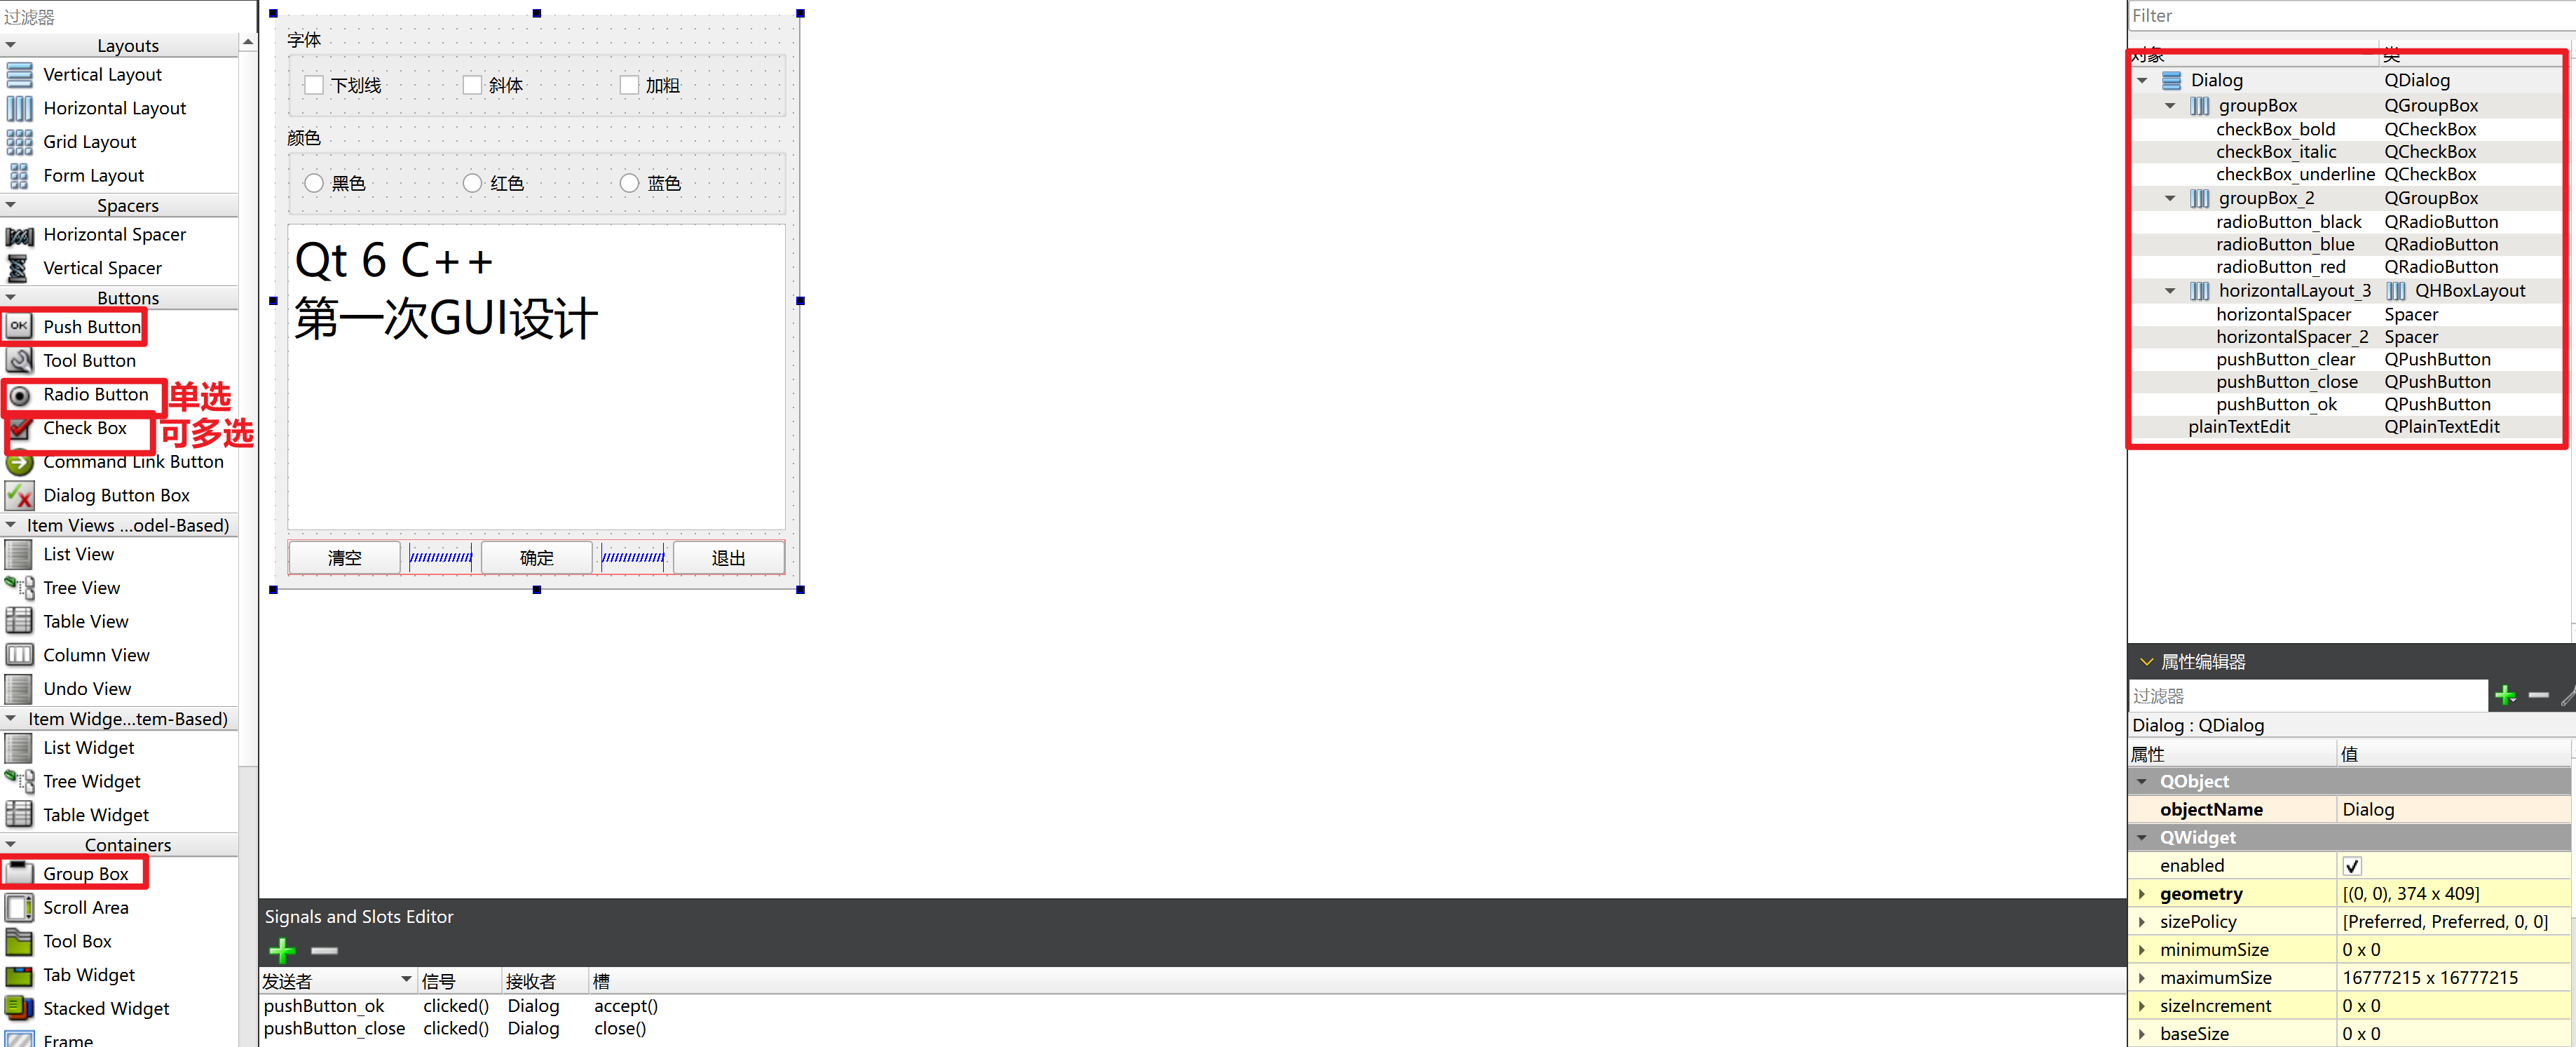
对于除颜色外其他按键的设置:
在dialog中添加如下代码:
1
2
3
4
5
6
7
8
9
10
11
12
13
14
15
16
17
18
19
20
21
22
23
24
25
void Dialog::on_pushButton_clear_clicked()
{
ui->plainTextEdit->clear();
}
void Dialog::on_checkBox_underline_clicked(bool checked)
{
QFont font=ui->plainTextEdit->font(); //得到当前的字体
font.setUnderline(checked); //根据bool checked修改字体的下划线
ui->plainTextEdit->setFont(font); //重新给字体加上下划线
}
void Dialog::on_checkBox_italic_clicked(bool checked)
{
QFont font=ui->plainTextEdit->font(); //得到当前的字体
font.setItalic(checked); //根据修改bool checked字体的斜体
ui->plainTextEdit->setFont(font); //重新给字体加上斜体
}
void Dialog::on_checkBox_bold_clicked(bool checked)
{
QFont font=ui->plainTextEdit->font(); //得到当前的字体
font.setBold(checked); //根据修改bool checked字体的粗体
ui->plainTextEdit->setFont(font); //重新给字体加上粗体
}
对于颜色的按键:
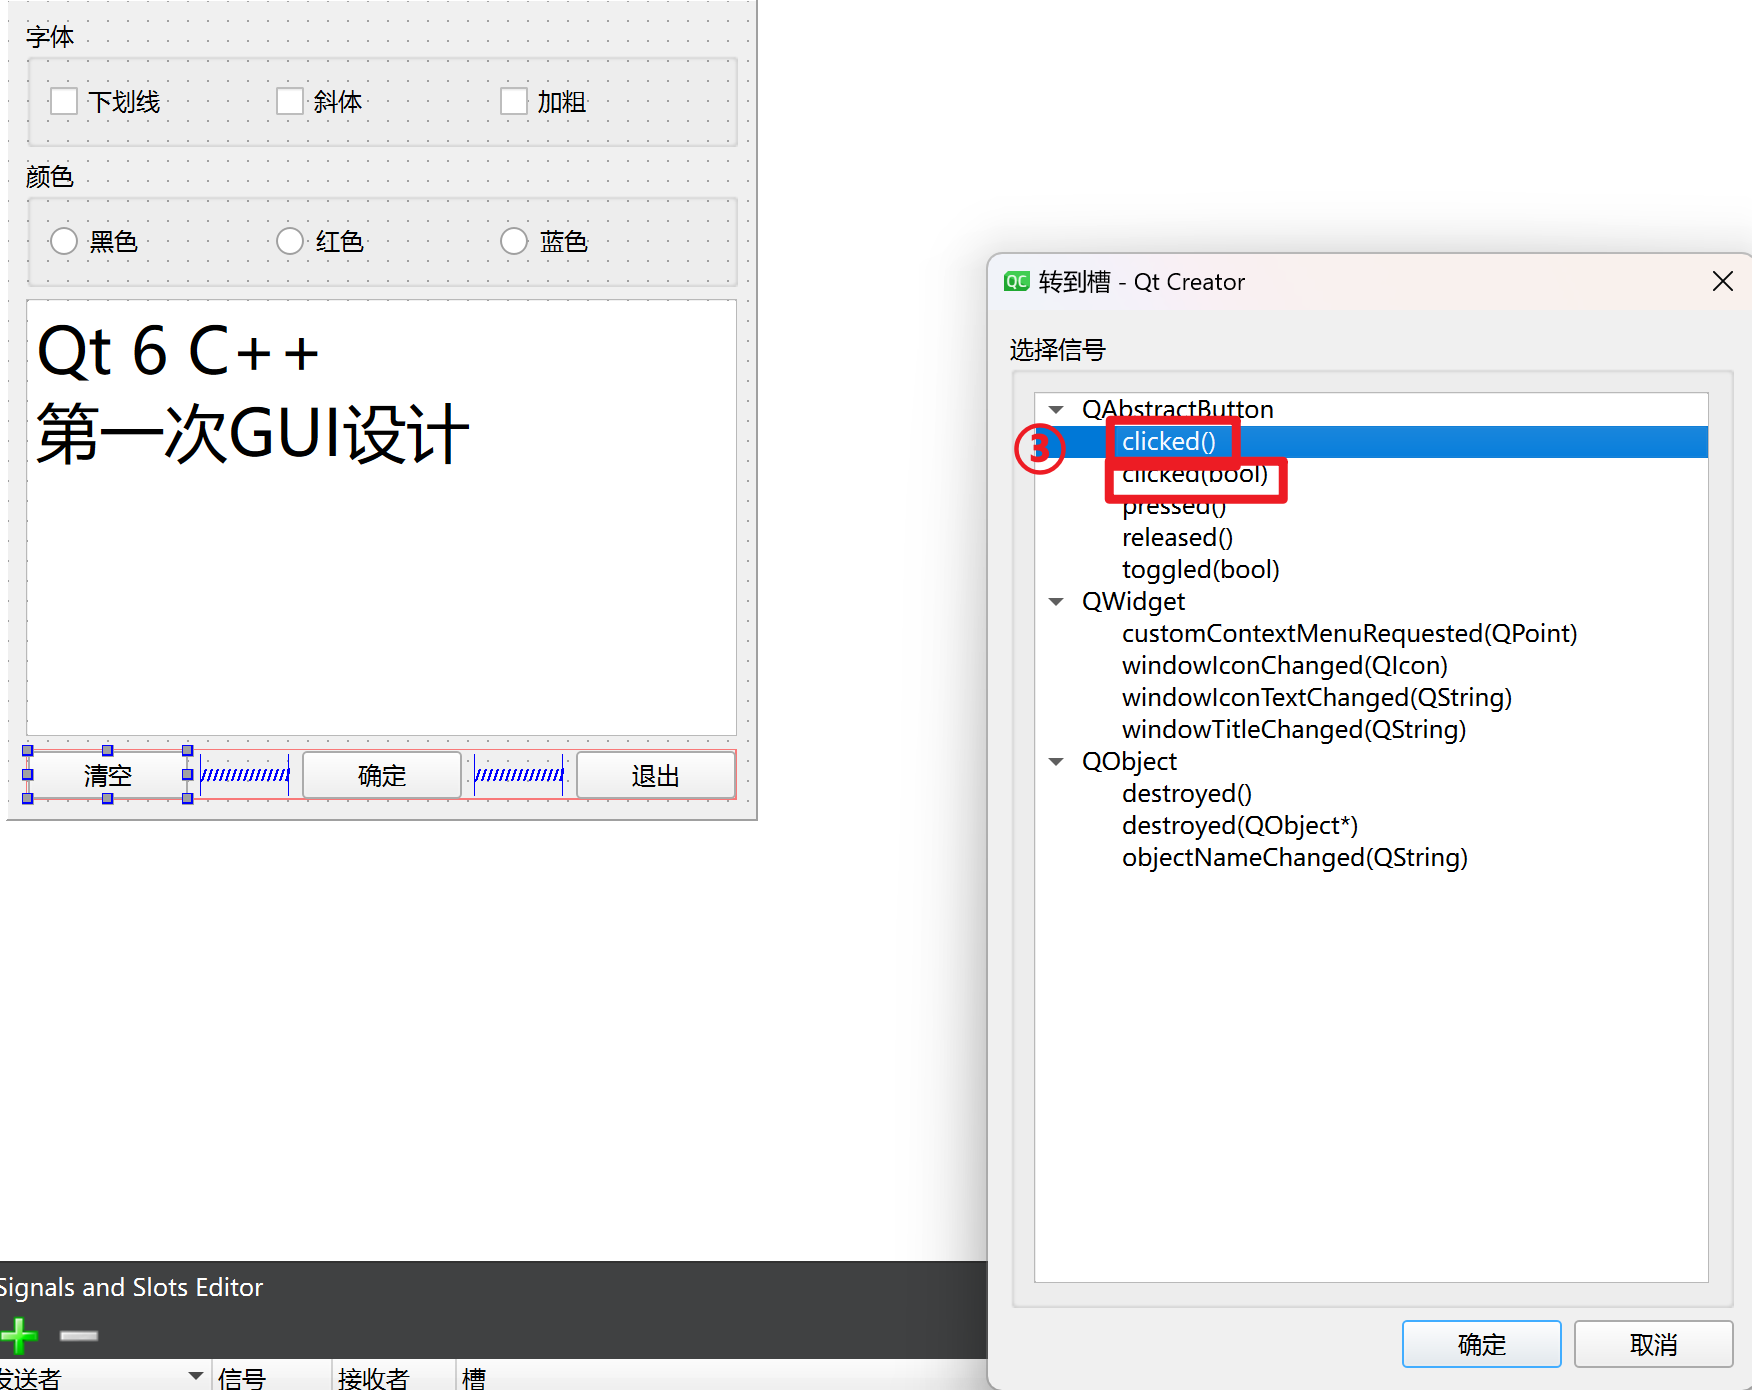
首先在dialog.cpp中定义函数do_FontColor,可右击定义处,在重构中选择下图所示,这样可以直接跳转到函数编辑处

其次,在dialog.cpp中编写函数
1
2
3
4
5
6
7
8
9
10
11
void Dialog::do_FontColor()
{
QPalette plet=ui->plainTextEdit->palette(); //QPalette是Qt中用于管理部件的调色板(颜色和样式)的类
if(ui->radioButton_black->isChecked()) //如果radioButton_black按键按下isChecked(),那么就将plet的颜色改为黑色
plet.setColor(QPalette::Text,Qt::black);
if(ui->radioButton_red->isChecked()) //如果radioButton_black按键按下isChecked(),那么就将plet的颜色改为红色
plet.setColor(QPalette::Text,Qt::red);
if(ui->radioButton_blue->isChecked()) //如果radioButton_black按键按下isChecked(),那么就将plet的颜色改为蓝色
plet.setColor(QPalette::Text,Qt::blue);
ui->plainTextEdit->setPalette(plet); //重新设置当前对象的颜色
}最后,在dialog.cpp中利用connect函数链接颜色按键与文本的关系
1
2
3
4
5
6
7
8
9Dialog::Dialog(QWidget *parent)
: QDialog(parent)
, ui(new Ui::Dialog)
{
ui->setupUi(this);
connect(ui->radioButton_black, SIGNAL(clicked()), this, SLOT(do_FontColor()));
connect(ui->radioButton_red, SIGNAL(clicked()), this, SLOT(do_FontColor()));
connect(ui->radioButton_blue, SIGNAL(clicked()), this, SLOT(do_FontColor()));
}
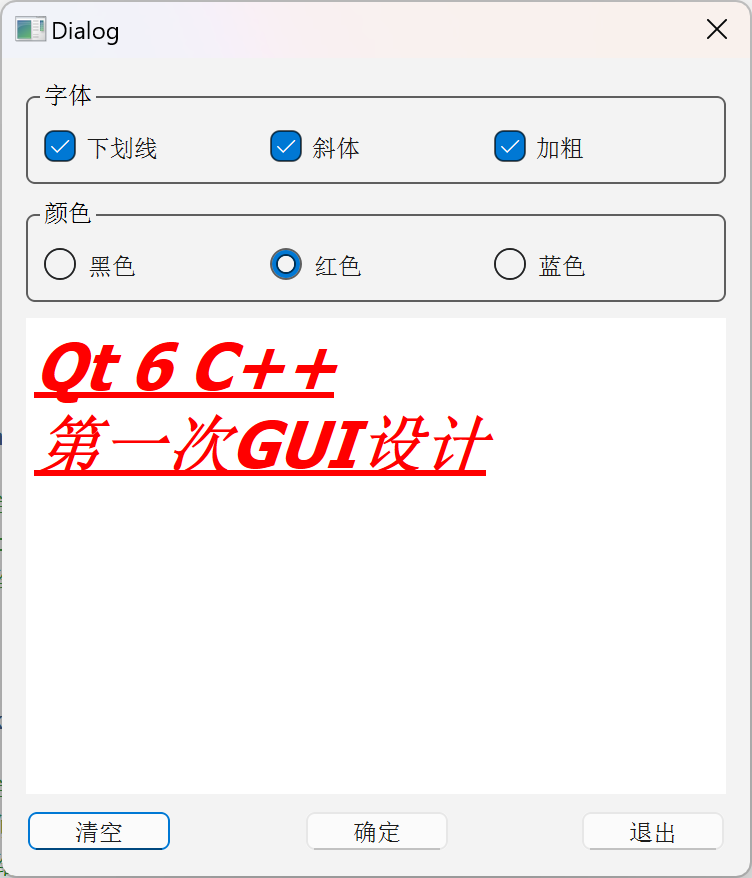
最终,大致结果如下:
4.代码UI设计
4.1 布局实现
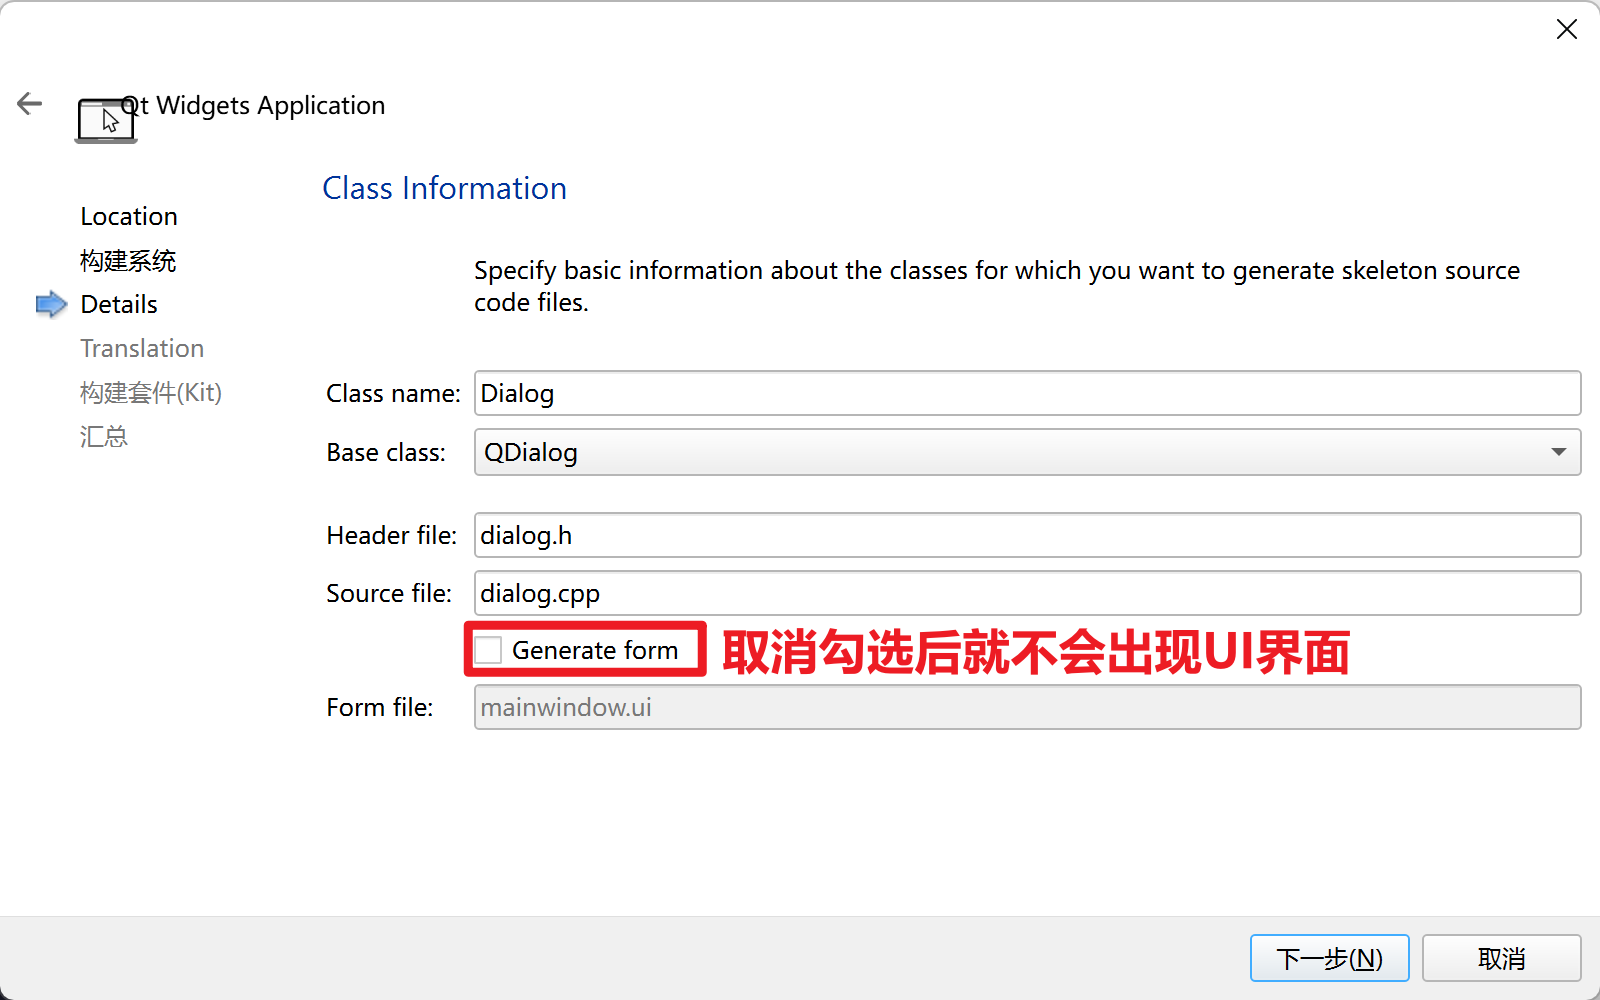
纯coding的话,不需要UI布局界面,在创建工程时需要取消generate form
布局的代码学过一点点C++的应该都能比较快速的看懂
dialog.h
1
2
3
4
5
6
7
8
9
10
11
12
13
14
15
16
17
18
19
20
21
22
23
24
25
26
27
28
29
30
31
32
33
34
35
class QCheckBox;
class QRadioButton;
class QPlainTextEdit;
class QPushButton;
class Dialog : public QDialog
{
Q_OBJECT
private:
QCheckBox *chkBoxUnder;
QCheckBox *chkBoxItalic;
QCheckBox *chkBoxBold;
QRadioButton *radioBlack;
QRadioButton *radioRed;
QRadioButton *radioBlue;
QPlainTextEdit *txtEdit;
QPushButton *btnOK;
QPushButton *btnCancel;
QPushButton *btnClose;
public:
Dialog(QWidget *parent = nullptr);
~Dialog();
};dialog.cpp
1
2
3
4
5
6
7
8
9
10
11
12
13
14
15
16
17
18
19
20
21
22
23
24
25
26
27
28
29
30
31
32
33
34
35
36
37
38
39
40
41
42
43
44
45
46
47
48
49
50
51
52
53
54
55
56
57
58
59
//添加布局要用到的头文件
Dialog::Dialog(QWidget *parent)
: QDialog(parent)
{
//创建要用的布局组件
chkBoxUnder = new QCheckBox("下划线");
chkBoxItalic = new QCheckBox("斜体");
chkBoxBold = new QCheckBox("加粗");
QHBoxLayout *HLay = new QHBoxLayout();
HLay -> addWidget(chkBoxUnder);
HLay -> addWidget(chkBoxItalic);
HLay -> addWidget(chkBoxBold);
radioBlack = new QRadioButton("黑色");
radioRed = new QRadioButton("红色");
radioBlue = new QRadioButton("蓝色");
QHBoxLayout *HLay2 = new QHBoxLayout();
HLay2 -> addWidget(radioBlack);
HLay2 -> addWidget(radioRed);
HLay2 -> addWidget(radioBlue);
txtEdit = new QPlainTextEdit;
txtEdit -> setPlainText("Hello world\n 手工创建!");
QFont font = txtEdit -> font();
font.setPointSize(20);
txtEdit -> setFont(font);
btnOK = new QPushButton("确定");
btnCancel = new QPushButton("取消");
btnClose = new QPushButton("退出");
QHBoxLayout *HLay3 = new QHBoxLayout();
HLay3 -> addStretch();
HLay3 -> addWidget(btnOK);
HLay3 -> addStretch();
HLay3 -> addWidget(btnCancel);
HLay3 -> addWidget(btnClose);
QVBoxLayout *VLay = new QVBoxLayout();
VLay -> addLayout(HLay);
VLay -> addLayout(HLay2);
VLay -> addWidget(txtEdit);
VLay -> addLayout(HLay3);
setLayout(VLay);
}
Dialog::~Dialog() {}
最终运行结果如下:
4.2 信号槽连接
其实跟可视化UI设计时写的代码类似,无非是加上信号与槽的关系,编写槽函数,然后connect连接
dialog.h
1
2
3
4
5
6
7
8
9
10
11
12
13
14
15
16
17
18
19
20
21
22
23
24
25
26
27
28
29
30
31
32
33
34
35
36
37
38
39
40
41
class QCheckBox;
class QRadioButton;
class QPlainTextEdit;
class QPushButton;
class Dialog : public QDialog
{
Q_OBJECT
private:
QCheckBox *chkBoxUnder;
QCheckBox *chkBoxItalic;
QCheckBox *chkBoxBold;
QRadioButton *radioBlack;
QRadioButton *radioRed;
QRadioButton *radioBlue;
QPlainTextEdit *txtEdit;
QPushButton *btnOK;
QPushButton *btnCancel;
QPushButton *btnClose;
private slots: //代表下面都是槽函数
void do_chkBoxUnder(bool checked);
void do_chkBoxItalic(bool checked);
void do_chkBoxBold(bool checked);
void do_setFontColor();
public:
Dialog(QWidget *parent = nullptr);
~Dialog();
};dialog.cpp
1
2
3
4
5
6
7
8
9
10
11
12
13
14
15
16
17
18
19
20
21
22
23
24
25
26
27
28
29
30
31
32
33
34
35
36
37
38
39
40
41
42
43
44
45
46
47
48
49
50
51
52
53
54
55
56
57
58
59
60
61
62
63
64
65
66
67
68
69
70
71
72
73
74
75
76
77
78
79
80
81
82
83
84
85
86
87
88
89
90
91
92
93
94
95
96
97
98
99
100
101
102
103
104
105
106
//添加布局要用到的头文件
void Dialog::do_chkBoxUnder(bool checked)
{
QFont font = txtEdit -> font();
font.setUnderline(checked);
txtEdit -> setFont(font);
}
void Dialog::do_chkBoxItalic(bool checked)
{
QFont font = txtEdit -> font();
font.setItalic(checked);
txtEdit -> setFont(font);
}
void Dialog::do_chkBoxBold(bool checked)
{
QFont font = txtEdit -> font();
font.setBold(checked);
txtEdit -> setFont(font);
}
void Dialog::do_setFontColor()
{
QPalette plet = txtEdit -> palette();
if(radioBlack -> isChecked())
plet.setColor(QPalette::Text, Qt::black);
if(radioRed -> isChecked())
plet.setColor(QPalette::Text, Qt::red);
if(radioBlue -> isChecked())
plet.setColor(QPalette::Text, Qt::blue);
txtEdit -> setPalette(plet);
}
Dialog::Dialog(QWidget *parent)
: QDialog(parent)
{
//创建要用的布局组件
chkBoxUnder = new QCheckBox("下划线");
chkBoxItalic = new QCheckBox("斜体");
chkBoxBold = new QCheckBox("加粗");
QHBoxLayout *HLay = new QHBoxLayout();
HLay -> addWidget(chkBoxUnder);
HLay -> addWidget(chkBoxItalic);
HLay -> addWidget(chkBoxBold);
radioBlack = new QRadioButton("黑色");
radioRed = new QRadioButton("红色");
radioBlue = new QRadioButton("蓝色");
QHBoxLayout *HLay2 = new QHBoxLayout();
HLay2 -> addWidget(radioBlack);
HLay2 -> addWidget(radioRed);
HLay2 -> addWidget(radioBlue);
txtEdit = new QPlainTextEdit;
txtEdit -> setPlainText("Hello world\n 手工创建!");
QFont font = txtEdit -> font();
font.setPointSize(20);
txtEdit -> setFont(font);
btnOK = new QPushButton("确定");
btnCancel = new QPushButton("取消");
btnClose = new QPushButton("退出");
QHBoxLayout *HLay3 = new QHBoxLayout();
HLay3 -> addStretch();
HLay3 -> addWidget(btnOK);
HLay3 -> addStretch();
HLay3 -> addWidget(btnCancel);
HLay3 -> addWidget(btnClose);
QVBoxLayout *VLay = new QVBoxLayout();
VLay -> addLayout(HLay);
VLay -> addLayout(HLay2);
VLay -> addWidget(txtEdit);
VLay -> addLayout(HLay3);
setLayout(VLay);
connect(chkBoxUnder, SIGNAL(clicked(bool)), this, SLOT(do_chkBoxUnder(bool)));
connect(chkBoxItalic, SIGNAL(clicked(bool)), this, SLOT(do_chkBoxItalic(bool)));
connect(chkBoxBold, SIGNAL(clicked(bool)), this, SLOT(do_chkBoxBold(bool)));
connect(radioBlack, SIGNAL(clicked(bool)), this, SLOT(do_setFontColor()));
connect(radioRed, SIGNAL(clicked(bool)), this, SLOT(do_setFontColor()));
connect(radioBlue, SIGNAL(clicked(bool)), this, SLOT(do_setFontColor()));
connect(btnOK, SIGNAL(clicked(bool)), this, SLOT(accept()));
connect(btnCancel, SIGNAL(clicked(bool)), this, SLOT(reject()));
connect(btnClose, SIGNAL(clicked(bool)), this, SLOT(close()));
setWindowTitle("手工打造UI");
}
Dialog::~Dialog() {}
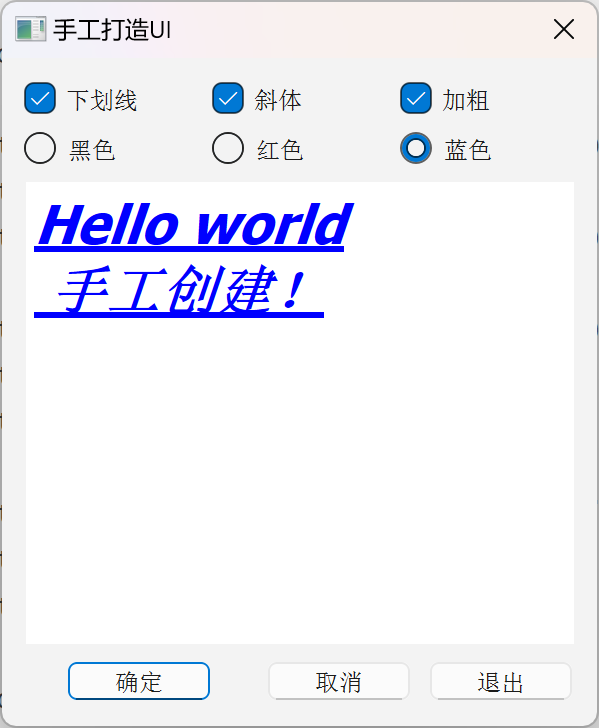
最终效果如下:
5.Qt Creator的一些快捷键
- F4:在同名的头文件和源程序文件之间切换
- F2:变量:跳转到声明;函数:声明和定义切换
- Ctrl+Shift+S:保存所有文件
元对象系统功能示例
Qt的元对象系统(Meta-Object System)是Qt编程的基础,它对标准C++语言进行了扩展,支持信号与槽、属性等特性
本示例基于QObject自定义了一个类TPerson,演示元对象系统一些特性的使用,包括自定义类信息,定义属性,定义动态属性,自定义信号等
目前我的理解是:Qt里面原本有很多已写好了的类可以直接调用,如果要新定义一些自己的类进行一些操作,就需要用QObject新定义类进行操作
tperson.h
1
2
3
4
5
6
7
8
9
10
11
12
13
14
15
16
17
18
19
20
21
22
23
24
25
26
27
28
29
30
31
32
33
34
35
36
37
38
39
class Tperson : public QObject
{
Q_OBJECT
//添加一些类的信息
Q_CLASSINFO("auther", "Shen")
Q_CLASSINFO("university", "xmu")
Q_CLASSINFO("version", "1.0.0")
//类属性
Q_PROPERTY(int age READ age WRITE setAge NOTIFY ageChanged FINAL)
Q_PROPERTY(QString name MEMBER m_name)
Q_PROPERTY(int score MEMBER m_score)
public:
explicit Tperson(QString name, QObject *parent = nullptr); //构造函数:它在对象被创建时自动调用,用于初始化对象的成员变量并执行任何必要的设置
~Tperson(); //析构函数:当该类型对象被销毁时,析构函数会自动调用(析构函数不能带有参数,且不返回任何值)
signals:
void ageChanged(int ageValue); //当年龄发生变化的时候,需要将改变后的年龄传递出去
public:
int age(); //读age
void setAge(int ageValue); //写age
void incAge(); //增加年龄,点击增长一岁时,调用此函数
private:
//QString m_sexl
QString m_name;
int m_age = 10;
int m_score = 79;
};
tperson.cpp
1
2
3
4
5
6
7
8
9
10
11
12
13
14
15
16
17
18
19
20
21
22
23
24
25
26
27
28
29
Tperson::Tperson(QString name, QObject *parent)
:QObject{parent}, m_name{name} //m_name{name}必须放在QObject{parent}之后,不然会报警告
{}
Tperson::~Tperson()
{
qDebug("TPerson类的对象被删除");
}
int Tperson::age()
{
return m_age;
}
void Tperson::setAge(int ageValue)
{
if(m_age != ageValue){
m_age = ageValue;
emit ageChanged(m_age);
}
}
void Tperson::incAge()
{
++m_age;
emit ageChanged(m_age); //年龄加1后,将结果发送出去
}widget.h
1
2
3
4
5
6
7
8
9
10
11
12
13
14
15
16
17
18
19
20
21
22
23
24
25
26
27
28
29
30
31
32
33
34
35
36
37
38
39
40
41
class Tperson;
QT_BEGIN_NAMESPACE
namespace Ui {
class Widget;
}
QT_END_NAMESPACE
class Widget : public QWidget
{
Q_OBJECT
public:
Widget(QWidget *parent = nullptr);
~Widget();
private:
Tperson *boy;
Tperson *girl;
private slots:
void do_ageChanged(int value);
void do_spinChanged(int arg1);
void on_btnBoyInc_clicked();
void on_btnGirlInc_clicked();
void on_btnClear_clicked();
void on_btnClassInfo_clicked();
private:
Ui::Widget *ui;
};widget.cpp
1
2
3
4
5
6
7
8
9
10
11
12
13
14
15
16
17
18
19
20
21
22
23
24
25
26
27
28
29
30
31
32
33
34
35
36
37
38
39
40
41
42
43
44
45
46
47
48
49
50
51
52
53
54
55
56
57
58
59
60
61
62
63
64
65
66
67
68
69
70
71
72
73
74
75
76
77
78
79
80
81
82
83
84
85
86
87
88
89
90
91
92
93
94
95
96
97
Widget::Widget(QWidget *parent)
: QWidget(parent)
, ui(new Ui::Widget)
{
ui->setupUi(this);
//定义类
boy = new Tperson("小明", this);
boy -> setAge(10);
boy -> setProperty("sex", "boy");
boy -> setProperty("score", 70);
girl = new Tperson("小红", this);
girl -> setAge(20);
girl -> setProperty("sex", "girl");
//定义属性
ui -> spinBoy -> setProperty("isBoy", true);
ui -> spinGirl -> setProperty("isBoy", false);
//先通过spinBox改变年龄,年龄改变后,其值传递给do_spinChanged,再在此函数里面setAge
connect(ui->spinBoy, SIGNAL(valueChanged(int)), this, SLOT(do_spinChanged(int))); //在运行时,当信号发出时,Qt会自动将信号的参数值传递给槽函数
connect(ui->spinGirl, SIGNAL(valueChanged(int)), this, SLOT(do_spinChanged(int)));
//从而会触发ageChanged,把修改后的年龄传递给do_ageChanged打印
connect(boy, SIGNAL(ageChanged(int)), this, SLOT(do_ageChanged(int)));
connect(girl, SIGNAL(ageChanged(int)), this, SLOT(do_ageChanged(int)));
connect(boy, SIGNAL(ageChanged(int)), ui -> spinBoy, SLOT(setValue(int))); //这两条语句是为了当btn改变时,spinBox也对应改变
connect(girl, SIGNAL(ageChanged(int)), ui -> spinGirl, SLOT(setValue(int)));
}
Widget::~Widget()
{
delete ui;
}
void Widget::do_ageChanged(int value)
{
Tperson *person = qobject_cast<Tperson*>(sender()); //通过sender()获取发送对象,再把这个对象类型强制转化为TPerson
QString str = QString("%1, %2, 年龄 = %3")
.arg(person -> property("name").toString(), person -> property("sex").toString(), QString::number(value));
ui -> plainTextEdit -> appendPlainText(str);
}
void Widget::do_spinChanged(int arg1)
{
QSpinBox *spinBox = qobject_cast<QSpinBox*>(sender());
if(spinBox -> property("isBoy").toBool())
boy -> setAge(arg1);
else
girl -> setAge(arg1);
}
void Widget::on_btnBoyInc_clicked()
{
boy -> incAge();
}
void Widget::on_btnGirlInc_clicked()
{
girl -> incAge();
}
void Widget::on_btnClear_clicked()
{
ui -> plainTextEdit -> clear();
}
void Widget::on_btnClassInfo_clicked()
{
const QMetaObject * meta = boy -> metaObject();
ui -> plainTextEdit -> appendPlainText(QString("类名称: %1\n").arg(meta -> className()));
ui -> plainTextEdit -> appendPlainText("属性: ");
for(int i = meta -> propertyOffset(); i < meta -> propertyCount(); i++)
{
const char* propName = meta -> property(i).name();
QString propValue = boy -> property(propName).toString();
ui -> plainTextEdit ->appendPlainText(QString("属性名称 = %1, 属性值 = %2").arg(propName, propValue));
}
ui -> plainTextEdit -> appendPlainText("\n类信息(classInfo): ");
for(int i = meta -> classInfoOffset(); i < meta -> classInfoCount(); i++)
{
QMetaClassInfo classInfo = meta -> classInfo(i);
ui -> plainTextEdit -> appendPlainText(
QString("Name = %1; Value = %2").arg(classInfo.name(), classInfo.value()));
}
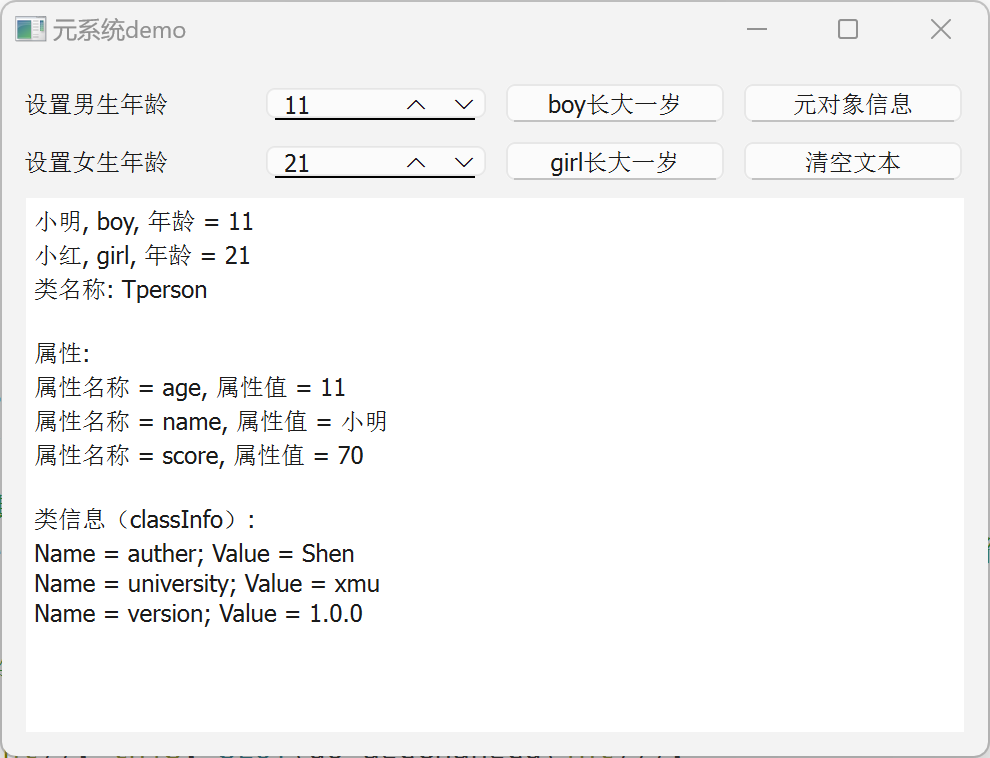
}最终结果如下:
容器类
- QT库提供了一组通用的基于模板的容器类,可用于存储指定类型的项,类似C++中的vector。例如,如果需要一个大小可变的QString数组,可以使用
QList<QString>或QStringList
1.顺序容器
QList、QStack和QQueue
对于大多数应用程序来说,QList是最好的选择,它提供了非常快的追加。如果确实需要使用链表,可以使用std::list
QStack和QQueue是便利类,提供了LIFO和FIFO语义
QList将数据项存储在相邻的内存位置,并提供快速的基于索引的访问
1
2
3
4
5
6
7
8
9
10QList<float> list; //定义一个float类型的数据列表
QList<int> list = {1, 2, 3, 4, 5}; //初始化列表数据
QList<int> list(100); //初始化列表元素个数为100,所有元素默认为0
QList<QString> strList(10, "pass"); //10个元素,每个元素都被初始化为pass
QList<QString> list;
list<<"Monday"<<"Tuesday"<<"Wednesday"<<"Thursday";
list.append("Friday");
QString str1 = list[0];
QString str2 = list.at(1); //就是访问list[1]
2.关联容器
QMap、QMultiMap(统一个key对应多个value)、QHash、QMultiHash和QSet
“multi”容器支持与一个键关联的多个值
“hash”容器通过使用散列函数而不是在有序集合上进行二分查找,从而提供了更快的查找速度
1
2
3
4
5
6
7
8
9
10
11
12
13
14
15
16
17
18
QMap<QString, int> map;
map["one"] = 1;
map["three"] = 3;
map["seven"] = 7;
map.insert("twelve", 12);
int num1 = map["one"];
//如果在map中没有指定键的项,这些函数返回一个默认构造的值
int num2 = map["thirteen"];
int num3 = map.value("thirteen");
//还有一个value()重载方法,如果指定的键不存在,则使用第二个参数作为默认值
int num4 = map.value("thirteen", 13); //''thirteen''不存在时查找value值,就会返回13
//遍历QMap
QMap<int, int> map;
...
QMap<int, int>::const_iterator i;
for(i = map.constBegin(); i != map.constEnd(); ++i)
qDebug() << i.key() << ':' << i.value();
QString与QChar基本使用
- QChar用UTF-16编码(16bit)表示一个字符,所以能表示汉字
- QString存储一个由QCha组成的字符串