0%

Pytorch之线性神经网络

本节主要介绍了回归问题与分类问题

线性回归从零开始实现

1
2
3
4
5
6
7
8
9
10
11
12
13
14
15
16
17
18
19
20
21
22
23
24
25
26
27
28
29
30
31
32
33
34
35
36
37
38
39
40
41
42
43
44
45
46
47
48
49
50
51
52
53
54
55
56
57
58
59
60
61
62
63
64
65
66
67
68
69
70
71
72
73
74
75
76
77
78
79
import random
import torch

#生成数据集
def synthetic_data(w, b, num_examples):
"""生成y=Xw+b+噪声"""
X = torch.normal(0, 1, (num_examples, len(w)))
w = w.reshape(len(w),1)
y = torch.matmul(X, w) + b
y += torch.normal(0, 0.01, y.shape)
return X, y

true_w = torch.tensor([2, -3.4])
true_b = 4.2
features, labels = synthetic_data(true_w, true_b, 1000)

print('features:', features[0],'\nlabel:', labels[0])
print('The features shape is:',features.shape)
print('The features shape is:',labels.shape)
print('---------------------------------------------')

#读取数据集
def data_iter(batch_size, features, labels):
num_examples = features.shape[0]
indices = list(range(num_examples))
# 这些样本是随机读取的,没有特定的顺序
random.shuffle(indices)
for i in range(0, num_examples, batch_size):#每次取batch_size个features与labels
batch_indices = torch.tensor(indices[i: min(i + batch_size, num_examples)])
yield features[batch_indices], labels[batch_indices]

batch_size = 10

for X, y in data_iter(batch_size, features, labels):
print(X, '\n', y)
break

#初始化模型的参数
w = torch.normal(0, 0.01, size=(2,1), requires_grad=True)
b = torch.zeros(1, requires_grad=True)

#定义线性回归模型
def linreg(X, w, b): #@save
"""线性回归模型"""
return torch.matmul(X, w) + b

#定义损失函数
def squared_loss(y_hat, y): #@save
"""均方损失"""
return (y_hat - y.reshape(y_hat.shape)) ** 2 / 2

#定义优化算法
def sgd(params, lr, batch_size): #@save
"""小批量随机梯度下降"""
with torch.no_grad():
for param in params:
param -= lr * param.grad / batch_size
param.grad.zero_()

#训练回归模型
lr = 0.03
num_epochs = 3
net = linreg
loss = squared_loss

for epoch in range(num_epochs):
for X, y in data_iter(batch_size, features, labels):
l = loss(net(X, w, b), y) # X和y的小批量损失
# 因为l形状是(batch_size,1),而不是一个标量。l中的所有元素被加到一起,
# 并以此计算关于[w,b]的梯度
l.sum().backward()
sgd([w, b], lr, batch_size) # 使用参数的梯度更新参数
with torch.no_grad():#这里是先通过batch_size迭代一个epoch后,得到此时的权重大小
train_l = loss(net(features, w, b), labels) #最后用一个epoch全部所有样本去计算训练误差
print(f'epoch {epoch + 1}, loss {float(train_l.mean()):f}')
#:f 是指输出格式,表示输出浮点数的值,并保留小数点后面的数字(默认保留6位小数)

print(f'w的估计误差: {true_w - w.reshape(true_w.shape)}')
print(f'b的估计误差: {true_b - b}')

结果如下:

1
2
3
4
5
6
7
8
9
10
11
12
13
14
15
16
17
18
19
20
21
22
23
24
25
26
27
28
29
30
features: tensor([-1.7930, -0.8309]) 
label: tensor([3.4262])
The features shape is: torch.Size([1000, 2])
The features shape is: torch.Size([1000, 1])
---------------------------------------------
tensor([[ 1.8215, -0.5405],
[-1.2937, 0.0948],
[-0.5884, 1.1061],
[ 0.8890, -0.3747],
[ 0.8483, 0.6304],
[ 0.0467, -0.5271],
[ 1.2621, 0.3016],
[ 1.4067, -0.1602],
[ 0.6865, -1.0503],
[ 0.9774, -1.1767]])
tensor([[ 9.6800],
[ 1.2851],
[-0.7400],
[ 7.2501],
[ 3.7616],
[ 6.1004],
[ 5.6812],
[ 7.5717],
[ 9.1570],
[10.1526]])
epoch 1, loss 0.038120
epoch 2, loss 0.000143
epoch 3, loss 0.000051
w的估计误差: tensor([0.0003, 0.0005], grad_fn=<SubBackward0>)
b的估计误差: tensor([-2.5749e-05], grad_fn=<RsubBackward1>)

线性回归的简洁实现

1
2
3
4
5
6
7
8
9
10
11
12
13
14
15
16
17
18
19
20
21
22
23
24
25
26
27
28
29
30
31
32
33
34
35
36
37
38
39
40
41
42
43
44
45
46
47
48
49
50
51
52
53
54
55
56
57
58
59
60
61
62
63
64
65
66
import numpy as np
import torch
from torch.utils import data

#生成合成数据集
def synthetic_data(w, b, num_examples):
"""生成y=Xw+b+噪声"""
X = torch.normal(0, 1, (num_examples, len(w)))
w = w.reshape(len(w),1)
y = torch.matmul(X, w) + b
y += torch.normal(0, 0.01, y.shape)
return X, y

true_w = torch.tensor([2, -3.4])
true_b = 4.2
features, labels = synthetic_data(true_w, true_b, 1000)

#我们可以调用框架中现有的API来读取数据
#我们将features和labels作为API的参数传递,并通过数据迭代器指定batch_size
def load_array(data_arrays, batch_size, is_train=True): #@save
"""构造一个PyTorch数据迭代器"""
dataset = data.TensorDataset(*data_arrays)
return data.DataLoader(dataset, batch_size, shuffle=is_train)

batch_size = 10
data_iter = load_array((features, labels), batch_size)
x1=next(iter(data_iter)) #next() 函数返回迭代器中的下一项。若添加返回值,以在迭代结束时返回。
print(x1)

########################################################
#定义模型
# nn是神经网络的缩写
from torch import nn
#第一个指定输入特征形状,即2,第二个指定输出特征形状,输出特征形状为单个标量,因此为1
net = nn.Sequential(nn.Linear(2, 1))

#初始化模型参数
#在PyTorch中,有默认的参数初始化方式。
#因此,当我们定义好网络模型之后,可以不对模型进行显式的参数初始化操作
#可以使用替换方法normal_和fill_来重写参数值
net[0].weight.data.normal_(0, 0.01)
net[0].bias.data.fill_(0)

#定义损失函数
#计算均方误差使用的是MSELoss类,也称为平方L2范数。默认情况下,它返回所有样本损失的平均值。
loss = nn.MSELoss()

#定义优化函数
trainer = torch.optim.SGD(net.parameters(), lr=0.03) #其实现的就是w-lr*(dw)

#训练
num_epochs = 3
for epoch in range(num_epochs):
for X, y in data_iter:
l = loss(net(X) ,y) #通过调用net(X)生成预测并计算损失l(前向传播)
trainer.zero_grad() #进行新一轮backward之前,一定要清空之前那个batch输入在计算图中留下的梯度
#否则下面的backward产生的新梯度将会和旧梯度形成梯度累加。
l.backward() #通过进行反向传播来计算梯度
trainer.step() #通过调用优化器来更新模型参数
l = loss(net(features), labels)
print(f'epoch {epoch + 1}, loss {l:f}')

w = net[0].weight.data
print('w的估计误差:', true_w - w.reshape(true_w.shape))
b = net[0].bias.data
print('b的估计误差:', true_b - b)

结果如下:

1
2
3
4
5
6
7
8
9
10
11
12
13
14
15
16
17
18
19
20
21
22
23
24
[tensor([[-0.8065,  0.9427],
[-0.4614, 0.0982],
[ 2.1349, 1.9414],
[ 1.4705, 0.5361],
[-0.3739, -1.3624],
[-0.6564, 0.4396],
[-0.8825, -0.4132],
[ 0.4002, -1.3953],
[ 1.0390, 1.4680],
[-1.7860, -0.5864]]), tensor([[-0.6337],
[ 2.9607],
[ 1.8597],
[ 5.3196],
[ 8.0967],
[ 1.3851],
[ 3.8302],
[ 9.7453],
[ 1.2802],
[ 2.6194]])]
epoch 1, loss 0.000171
epoch 2, loss 0.000107
epoch 3, loss 0.000106
w的估计误差: tensor([-0.0002, 0.0007])
b的估计误差: tensor([5.1498e-05])

波斯顿房价预测实现

1.网络搭建与训练

1
2
3
4
5
6
7
8
9
10
11
12
13
14
15
16
17
18
19
20
21
22
23
24
25
26
27
28
29
30
31
32
33
34
35
36
37
38
39
40
41
42
43
44
45
46
47
48
49
50
51
52
53
54
55
56
57
58
59
60
61
62
63
64
65
66
67
68
69
70
71
72
73
74
75
import torch

#1.数据集处理
import numpy as np
import re
ff = open("housing.data").readlines()
data = []
for item in ff:
out = re.sub(r"\s{2,}", " ", item).strip() #使得每一行的每个数之间只有一个空格
data.append(out.split(" ")) #利用空格对数据进行分割
data = np.array(data).astype(np.float) #将数据转化为float型
#print(data.shape) #将有506*14的数据矩阵,其中506表示有506条数据,14中前13个是input特征,第14个是label标签

X = data[:, 0: -1] #input
Y = data[:, -1] #label

#数据集的划分
X_train = X[0: 496, :]
Y_train = Y[0: 496]
X_test = X[496: , :]
Y_test = Y[496: 506]

#2.搭建网络
class Net(torch.nn.Module):
def __init__(self, n_feature, n_output):
super(Net, self).__init__()
self.hidden = torch.nn.Linear(n_feature, 100)
self.predict = torch.nn.Linear(100, n_output)

def forward(self, x):
out_hidden = self.hidden(x)
out_relu = torch.relu(out_hidden)
out = self.predict(out_relu)
return out

net = Net(13, 1) #初始化网络

#3.定义损失函数
loss_func = torch.nn.MSELoss() #采用均方loss

#4.定义优化器
optimizer = torch.optim.SGD(net.parameters(), lr = 1e-5)

#5.训练模型
for i in range(10000):#训练一万次
#训练集
x_data = torch.tensor(X_train, dtype = torch.float32)
y_data = torch.tensor(Y_train, dtype = torch.float32)
pred = net.forward(x_data)
pred = pred.reshape(-1)
loss_train = loss_func(pred, y_data)

optimizer.zero_grad() #将数据网络中参数的梯度清零
loss_train.backward() #利用backward进行反向传播
optimizer.step() #对网络中的参数进行梯度更新

# print("ite: {}, loss:{}".format(i, loss)) #打印训练次数与loss的结果
# print(pred[0: 10]) #预测数据的前10个值
# print(y_data[0: 10]) #与真实数据的前10个值

#测试集
x_data = torch.tensor(X_test, dtype = torch.float32)
y_data = torch.tensor(Y_test, dtype = torch.float32)
pred = net.forward(x_data)
pred = pred.reshape(-1)
loss_test = loss_func(pred, y_data)

print("ite: {}, loss:{}".format(i, loss_train, loss_test))

#6.保存模型
torch.save(net, "Boston_model.pkl") #并使用torch.load("")加载
#若使用torch.save(net.state_dict(), "params.pkl")只保存模型参数
#那么使用时先加载网络net,再使用net.load_state_dict("")加载模型参数

#7.测试模型(在另一个文件夹中展示)

2.模型测试与评估

1
2
3
4
5
6
7
8
9
10
11
12
13
14
15
16
17
18
19
20
21
22
23
24
25
26
27
28
29
30
31
32
33
34
35
36
37
38
39
40
41
42
43
44
import torch

#1.数据集处理
import numpy as np
import re
ff = open("housing.data").readlines()
data = []
for item in ff:
out = re.sub(r"\s{2,}", " ", item).strip() #使得每一行的每个数之间只有一个空格
data.append(out.split(" ")) #利用空格对数据进行分割
data = np.array(data).astype(np.float) #将数据转化为float型
#print(data.shape) #将有506*14的数据矩阵,其中506表示有506条数据,14中前13个是input特征,第14个是label标签

X = data[:, 0: -1] #input
Y = data[:, -1] #label

#数据集的划分
X_var = X[135: 178, :]
Y_var = Y[135: 178]

#2.加载模型
class Net(torch.nn.Module):
def __init__(self, n_feature, n_output):
super(Net, self).__init__()
self.hidden = torch.nn.Linear(n_feature, 100)
self.predict = torch.nn.Linear(100, n_output)

def forward(self, x):
out_hidden = self.hidden(x)
out_relu = torch.relu(out_hidden)
out = self.predict(out_relu)
return out

net = torch.load("Boston_model.pkl")

#3.测试与验证模型
x_data = torch.tensor(X_var, dtype = torch.float32)
y_data = torch.tensor(Y_var, dtype = torch.float32)
pred = net.forward(x_data)
pred = pred.reshape(-1)
loss_func = torch.nn.MSELoss()
loss_test = loss_func(pred, y_data)

print("loss test: {}".format(loss_test)) #打印验证损失

softmax回归

1.softmax函数

  • softmax函数能够将未规范化的预测变换为非负数并且总和为1,同时让模型保持 可导的性质
    $$
    Softmax(z_i)=\frac{e^{z_i}}{\sum_{c=1}^Ce^{z_c}}
    $$

  • 其中$z_i$为第$i$个节点的输出值,C为输出节点的个数,即分类的类别个数

2.损失函数

  • 对于任何标签$y$和模型预测$\hat{y}$(回归模型经过softmax函数后的预测概率值),损失函数为:
    $$
    l(y,\hat y)=-\sum_{j=1}^qy_jlog\hat y_j
    $$

  • 该损失函数通常被称为交叉熵损失

  • 由于$y$是一个长度为$q$的独热编码向量,所以除一个项以外的所有项$j$都消失了

  • 由于所有$\hat{y}$都是预测的概率,所以它们的对数永远不会大于0

3.图像分类数据集Fashion-mnist

  • Fashion-MNIST由10个类别的图像组成, 每个类别由训练数据集(train dataset)中的6000张图像和测试数据集(test dataset)中的1000张图像组成

  • 因此,训练集和测试集分别包含60000和10000张图像

  • 测试数据集不会用于训练,只用于评估模型性能

  • 每个输入图像的高度和宽度均为28像素。 数据集由灰度图像组成,其通道数为1

  • 将高度$h$像素、宽度$w$像素图像的形状记为$h\times w$或$(h,w)$

  • transforms.ToTensor() 的作用是将 PIL 图像或 NumPy 数组转换为一个张量(Tensor)格式,并将其归一化为值在 [0,1] 之间的浮点数

  • torchvision.datasets.FashionMNIST 函数返回的是一个 Dataset 对象,而不是一个 Tensor 对象。因此,不能通过调用 shape 属性来获取数据集的大小和形状

    1
    2
    3
    4
    5
    6
    7
    8
    9
    10
    11
    12
    13
    14
    15
    16
    17
    18
    19
    20
    21
    22
    23
    24
    25
    26
    27
    28
    29
    30
    31
    32
    33
    34
    35
    36
    37
    38
    39
    40
    41
    42
    43
    44
    45
    46
    47
    48
    49
    50
    51
    52
    53
    54
    55
    56
    57
    58
    59
    60
    61
    62
    63
    64
    65
    66
    67
    68
    69
    70
    71
    72
    73
    74
    75
    76
    77
    78
    79
    80
    import torch
    import torchvision
    from torch.utils import data
    from torchvision import transforms
    import time
    import numpy as np
    import matplotlib.pyplot as plt

    #定义一个计时器
    class Timer: #@save
    """记录多次运行时间"""
    def __init__(self):
    self.times = []
    self.start()

    def start(self):
    """启动计时器"""
    self.tik = time.time()

    def stop(self):
    """停止计时器并将时间记录在列表中"""
    self.times.append(time.time() - self.tik)
    return self.times[-1]

    def avg(self):
    """返回平均时间"""
    return sum(self.times) / len(self.times)

    def sum(self):
    """返回时间总和"""
    return sum(self.times)

    def cumsum(self):
    """返回累计时间"""
    return np.array(self.times).cumsum().tolist()

    #读取数据集
    trans = transforms.ToTensor() #通过ToTensor实例将图像数据从PIL类型变换成32位浮点数格式
    mnist_train = torchvision.datasets.FashionMNIST(
    root="D:\App_Data_File\VScode_Project\Python\Pytorch\dataset\Fashion-MNIST", train=True, transform=trans, download=True)
    mnist_test = torchvision.datasets.FashionMNIST(
    root="D:\App_Data_File\VScode_Project\Python\Pytorch\dataset\Fashion-MNIST", train=False, transform=trans, download=True)

    #获取mnist_train中的第一个样本,即 mnist_train[0]。
    #这个样本包含一个图像数据和一个标签
    #使用一个元组来将它们分别赋值给image和label变量
    #最后,输出image的形状,以查看它的维度信息
    sample = mnist_train[0] # 获取第一个样本
    image, label = sample
    print(image.shape) # 输出训练集第一个图像数据的形状

    #Fashion-MNIST中包含的10个类别
    #分别为t-shirt(T恤)、trouser(裤子)、pullover(套衫)、dress(连衣裙)、coat(外套)
    #sandal(凉鞋)、shirt(衬衫)、sneaker(运动鞋)、bag(包)和ankle boot(短靴)
    #以下函数用于在数字标签索引及其文本名称之间进行转换。
    def get_fashion_mnist_labels(labels): #@save
    """返回Fashion-MNIST数据集的文本标签"""
    text_labels = ['t-shirt', 'trouser', 'pullover', 'dress', 'coat',
    'sandal', 'shirt', 'sneaker', 'bag', 'ankle boot']
    return text_labels[labels]

    #画出数据集中前20个训练集的图像
    # fig, axs = plt.subplots(4, 5, figsize=(10, 8))
    # for i in range(20):
    # image, label = mnist_train[i]
    # row, col = divmod(i, 5)
    # axs[row, col].imshow(image.squeeze(), cmap='CMRmap')
    # axs[row, col].set_title(f'Label: {get_fashion_mnist_labels(label)}')
    # axs[row, col].axis('off')
    # plt.show()

    ##读取小批量数据集
    batch_size = 256
    train_iter = data.DataLoader(mnist_train, batch_size, shuffle=True)

    #查看读取数据集所需要的时间
    timer = Timer()
    for X, y in train_iter:
    continue
    print(f'{timer.stop():.2f} sec')

    结果如下:

    1
    2
    torch.Size([1, 28, 28])
    2.00 sec
    image-20230412194037759

softmax回归的简洁实现

1
2
3
4
5
6
7
8
9
10
11
12
13
14
15
16
17
18
19
20
21
22
23
24
25
26
27
28
29
30
31
32
33
34
35
36
37
38
39
40
41
42
43
44
45
46
47
48
49
50
51
52
53
54
55
56
57
58
59
60
61
62
63
64
65
66
67
68
69
70
71
72
73
74
75
76
77
78
79
80
81
82
83
84
85
86
87
88
89
90
91
92
93
94
95
96
97
98
99
100
101
102
103
104
105
106
107
108
109
110
111
112
113
114
import torch
from torch.utils import data
from torchvision import transforms
import torchvision
from torch import nn
import matplotlib.pyplot as plt

#读取数据集
trans = transforms.ToTensor() #通过ToTensor实例将图像数据从PIL类型变换成32位浮点数格式
mnist_train = torchvision.datasets.FashionMNIST(
root="D:\App_Data_File\VScode_Project\Python\Pytorch\dataset\Fashion-MNIST", train=True, transform=trans, download=False)
mnist_test = torchvision.datasets.FashionMNIST(
root="D:\App_Data_File\VScode_Project\Python\Pytorch\dataset\Fashion-MNIST", train=False, transform=trans, download=False)

batch_size = 256
train_iter = data.DataLoader(mnist_train, batch_size, shuffle=True)
test_iter = data.DataLoader(mnist_test, batch_size, shuffle=False)

# PyTorch不会隐式地调整输入的形状。因此,
# 我们在线性层前定义了展平层(flatten),来调整网络输入的形状
net = nn.Sequential(nn.Flatten(), nn.Linear(784, 10))

def init_weights(m):
if type(m) == nn.Linear:
nn.init.normal_(m.weight, std=0.01)

net.apply(init_weights)

#交叉熵损失函数
#reduction='none'意味着每个元素的损失将作为与输入张量相同形状的张量返回
loss = nn.CrossEntropyLoss(reduction='none')

#优化算法:使用学习率为0.1的小批量随机梯度下降作为优化算法
trainer = torch.optim.SGD(net.parameters(), lr=0.1)

#训练模型
num_epochs = 10

train_loss = []
train_acc = []
test_loss = []
test_acc = []

for epoch in range(num_epochs):
net.train()
total_loss, total_correct = 0.0, 0.0
for X, y in train_iter:
y_hat = net(X)
l = loss(y_hat, y)
trainer.zero_grad()
l.mean().backward()
trainer.step()

total_loss += l.sum()
total_correct += (y_hat.argmax(dim=1) == y).sum().float()

train_loss.append(total_loss.detach().numpy() / len(mnist_train))
train_acc.append(total_correct / len(mnist_train))

net.eval()
total_loss, total_correct = 0.0, 0.0
for X, y in test_iter:
y_hat = net(X)
l = loss(y_hat, y)

total_loss += l.sum()
total_correct += (y_hat.argmax(dim=1) == y).sum().float()

test_loss.append(total_loss.detach().numpy() / len(mnist_test))
test_acc.append(total_correct / len(mnist_test))

print(f"Epoch [{epoch + 1}/{num_epochs}], Train Loss: {train_loss[-1]:.4f}, Train Acc: {train_acc[-1]*100:.2f}%, Test Loss: {test_loss[-1]:.4f}, Test Acc: {test_acc[-1]*100:.2f}%")

plt.figure(figsize=(10, 5))
plt.subplot(1, 2, 1)
plt.plot(train_loss, label='Train Loss')
plt.plot(test_loss, label='Test Loss')
plt.xlabel('Epoch')
plt.ylabel('Loss')
plt.legend()

plt.subplot(1, 2, 2)
plt.plot(train_acc, label='Train Acc')
plt.plot(test_acc, label='Test Acc')
plt.xlabel('Epoch')
plt.ylabel('Accuracy')
plt.legend()

plt.show()

##从测试集中选中10个样本去测试训练好的模型,并可视化测试结果
def get_fashion_mnist_labels(labels): #@save
"""返回Fashion-MNIST数据集的文本标签"""
text_labels = ['t-shirt', 'trouser', 'pullover', 'dress', 'coat',
'sandal', 'shirt', 'sneaker', 'bag', 'ankle boot']
return text_labels[labels]

test_samples = data.DataLoader(mnist_test, batch_size=10, shuffle=True)
test_batch = next(iter(test_samples))
X_test, y_test = test_batch

# 预测并可视化结果
net.eval()
with torch.no_grad():
y_pred = net(X_test).argmax(dim=1)

fig2=plt.figure(figsize=(10, 3))
for i in range(10):
plt.subplot(2, 5, i+1)
plt.imshow(X_test[i, 0], cmap='CMRmap')
plt.title(f"Pred: {get_fashion_mnist_labels(y_pred[i])}, Actual: {get_fashion_mnist_labels(y_test[i])}")
plt.axis('off')
fig2.subplots_adjust(hspace=1, wspace=1)
plt.show()

结果如下:

1
2
3
4
5
6
7
8
9
10
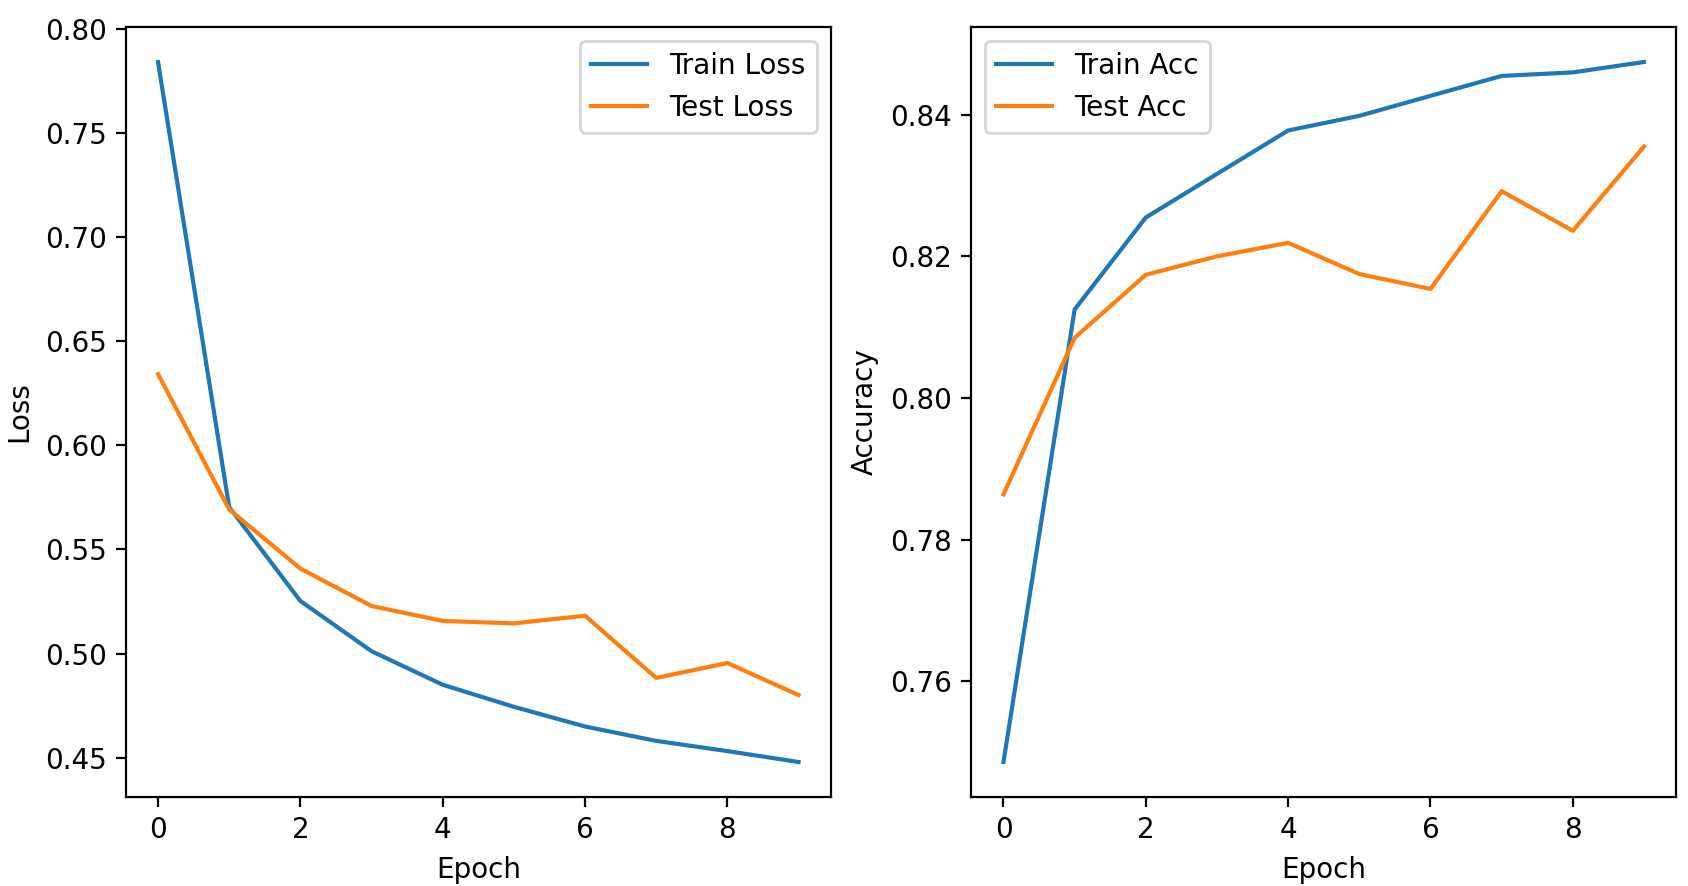
Epoch [1/10], Train Loss: 0.7841, Train Acc: 74.86%, Test Loss: 0.6342, Test Acc: 78.64%
Epoch [2/10], Train Loss: 0.5703, Train Acc: 81.25%, Test Loss: 0.5693, Test Acc: 80.85%
Epoch [3/10], Train Loss: 0.5253, Train Acc: 82.55%, Test Loss: 0.5408, Test Acc: 81.74%
Epoch [4/10], Train Loss: 0.5012, Train Acc: 83.16%, Test Loss: 0.5229, Test Acc: 82.00%
Epoch [5/10], Train Loss: 0.4850, Train Acc: 83.78%, Test Loss: 0.5157, Test Acc: 82.19%
Epoch [6/10], Train Loss: 0.4744, Train Acc: 83.98%, Test Loss: 0.5145, Test Acc: 81.75%
Epoch [7/10], Train Loss: 0.4650, Train Acc: 84.26%, Test Loss: 0.5182, Test Acc: 81.54%
Epoch [8/10], Train Loss: 0.4581, Train Acc: 84.55%, Test Loss: 0.4883, Test Acc: 82.92%
Epoch [9/10], Train Loss: 0.4532, Train Acc: 84.60%, Test Loss: 0.4955, Test Acc: 82.36%
Epoch [10/10], Train Loss: 0.4479, Train Acc: 84.74%, Test Loss: 0.4801, Test Acc: 83.55%
image-20230412220145971 image-20230412220215897

image-20230412220235794


手写数字集的识别

1.数据集处理与模型训练

1
2
3
4
5
6
7
8
9
10
11
12
13
14
15
16
17
18
19
20
21
22
23
24
25
26
27
28
29
30
31
32
33
34
35
36
37
38
39
40
41
42
43
44
45
46
47
48
49
50
51
52
53
54
55
56
57
58
59
60
61
62
63
import torch
import torchvision.datasets as dataset
import torchvision.transforms as transforms
import torch.utils.data as data_utils
from mnist_net import CNN

#1.数据集处理
train_data = dataset.MNIST(root = "mnist",
train = True, #加载训练集
transform = transforms.ToTensor(), #将数据转化为tensor
download = True)
test_data = dataset.MNIST(root = "mnist",
train = False, #加载测试集
transform = transforms.ToTensor(), #将数据转化为tensor
download = False)

#batchsize:利用DataLoader完成数据小批量采样
train_loader = data_utils.DataLoader(dataset = train_data,
batch_size = 64,
shuffle = True)
test_loader = data_utils.DataLoader(dataset = test_data,
batch_size = 64,
shuffle = False)

#2.搭建网络
cnn = CNN()

#3.定义损失函数
loss_func = torch.nn.CrossEntropyLoss() #分类问题采用交叉熵损失函数

#4.定义优化率
optimizer = torch.optim.Adam(cnn.parameters(), lr = 0.01)

#5.训练模型
loss_test = 0
accuracy_test = 0
for epoch in range(10):
#训练集
for i, (images, labels) in enumerate(train_loader):
outputs = cnn(images)
loss_train = loss_func(outputs, labels)
optimizer.zero_grad()
loss_train.backward()
optimizer.step()
# print("echo is {}, {}/{}, loss is {}".format(epoch + 1, i, len(train_data)//64, loss_train.item()))
#测试集
for i, (images, labels) in enumerate(test_loader):
outputs = cnn(images)
#计算每个batch的损失和
loss_test += loss_func(outputs, labels)
#计算每个batch的正确率
_, pred = outputs.max(1) #1表示在第一个维度上,即每张图对应输出10个值的那一行,pred是最大值的索引
accuracy_test += (pred == labels).sum().item()
accuracy_test = accuracy_test / len(test_data)
loss_test = loss_test / (len(test_data) // 64)

print("epoch is {}, accuracy_test is {}, loss_train is {}, loss_test is {}".format(epoch + 1,
accuracy_test,
loss_train.item(),
loss_test.item()))

#6.保存模型
torch.save(cnn, "mnist_model.pkl")

2.网络搭建

1
2
3
4
5
6
7
8
9
10
11
12
13
14
15
16
17
import torch

class CNN(torch.nn.Module):
def __init__(self):
super(CNN, self).__init__()
self.conv = torch.nn.Sequential(
torch.nn.Conv2d(1, 32, kernel_size = 5, padding = 2),
torch.nn.BatchNorm2d(32),
torch.nn.ReLU(),
torch.nn.MaxPool2d(2)
)
self.fc = torch.nn.Linear(14 * 14 * 32, 10)
def forward(self, x):
out = self.conv(x)
out = out.reshape(out.size()[0], -1)
out = self.fc(out)
return out

3.模型测试与评估

1
2
3
4
5
6
7
8
9
10
11
12
13
14
15
16
17
18
19
20
21
22
23
24
25
26
27
28
29
30
31
32
33
34
35
36
37
38
39
40
41
42
43
44
45
46
47
48
49
import torch
import torchvision.datasets as dataset
import torchvision.transforms as transforms
import torch.utils.data as data_utils
from mnist_net import CNN
import cv2

#1.数据集处理
test_data = dataset.MNIST(root = "mnist",
train = False, #加载测试集
transform = transforms.ToTensor(), #将数据转化为tensor
download = False)

test_loader = data_utils.DataLoader(dataset = test_data,
batch_size = 64,
shuffle = False)

#2.加载模型
cnn = torch.load("mnist_model.pkl")

#3.测试与验证模型
loss_test = 0
loss_func = torch.nn.CrossEntropyLoss()
accuracy_test = 0
#测试集
for i, (images, labels) in enumerate(test_loader):
outputs = cnn(images)
#计算每个batch的损失和
loss_test += loss_func(outputs, labels)
#计算每个batch的正确率
_, pred = outputs.max(1) #1表示在第一个维度上,即每张图对应输出10个值的那一行,pred是最大值的索引
accuracy_test += (pred == labels).sum().item()

#可视化分析并显示结果
for idx in range(images.shape[0]):
im_data = images[idx].numpy()
im_data = im_data.transpose(1, 2, 0)
im_label = labels[idx].numpy()
im_pred = pred[idx].numpy()

print("label", im_label)
print("pred", im_pred)
cv2.imshow("imdata", im_data)
cv2.waitKey(0)

accuracy_test = accuracy_test / len(test_data)
loss_test = loss_test / (len(test_data) // 64)

print("Loss test: {}, Accuracy test: {}".format(loss_test, accuracy_test))

交叉熵损失函数


Reference

欢迎来到ssy的世界